
Make Anything Look Like Anything Else
Would it were wood...
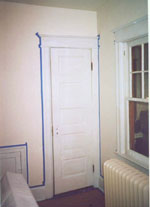
Step 1: Apply Primer
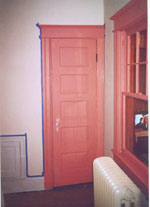
Step 2: Apply Color Base
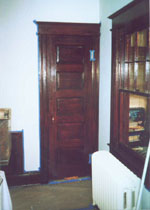
Step 3: Apply Graining Medium
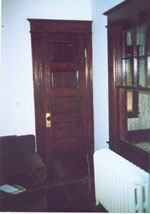
Step 4: Urethane Tone Wash
Uploaded 6-15-2001
When I started this project last November, I had no idea about how long it would take. Yes, I have been working on it for about six months... The scope of the work was somewhat extensive --- I had not touched my office, library or hall in 20 years. The goal was to return these three spaces to more-or-less 1922 (that’s when the house was built) conditions with unpainted woodwork. It would be possible to strip the paint off, but this is a very messy job and there is always the problem with Lead Based Paint . A mess is one thing, but living with a mess AND wearing a respirator at the same time is another thing.
I remembered that my Dad’s woodworking business included two German men who could make anything out of anything and if need be, make anything look like anything else. One summer, I was involved with these fellows in a project to create a whole room in red mahogany --- even though the budget only allowed for pine. I remember how wonderful the results looked.
A lot of this was done from memory, although I had some very good assistance from the guys at Monarch paints. Basically, there are four "steps" --- given that you have a room that has all the plaster in good shape and there is a good coat of paint on the walls. If you are restoring a house, you can plan on painting everything in your room five to six times.
My project involved 13 double hung windows (and shutters), 8 doors, a large built-in bookcase, and a stairwell.
Step 1: The woodwork must be painted with a very high quality shecllac-based primer to ensure that the graining stays bonded to the wood. The existing painted surface should be roughed up (and cleaned) with synthetic steel wool. Remove all sanding residue and prime, allowing plenty of time for the primer to dry.
Step 2: Apply the color base. Red mahogany has a "pink" undertone. I experimented for some time, mixing pigments with white paint. When I got the pink that I wanted, I took the sample to the Monarch paint store and they mixed me a gallon. This is flat interior alkyd paint. Alas, no latex paint here. Prepare to wear rubber gloves and buy a lot of paint thinner. The color base needs to dry hard, allow 3 days.
Step 3: Apply the graining medium. The "medium" is pigments (brown, red, burnt umber) in spar varnish. The pigments will not blend uniformly, and when spread with a brush, or tool they will form what appears to be the grain of wood. I had some trouble getting this part right when I got a great hint from the guys at Monarch. I bough a gallon of Minwax Red Mahogany stain, let it sit for a week, and poured off the solvent liquid. What was left was the correct mix of pigments. This was mixed on a 1-1 basis with Spar Varnish to create the graining medium. The project actually used a gallon of the stuff! The doors are done in the following order: panels, rails (horizontal) and stiles (vertical). The panels are grained to simulate hearts of mahogany. The graining medium is applied, allowed to dry for about an hour, and then worked with a variety of tools to create the desired effects:
- combs (metal things that look like combs) are used to lay down straight grain
- a rubber form is used to create knots
- a dry brush with extra-long bristles (called a "flogger") is used to create the appearance of cell structure in the wood
Step 4: Urethane wash. The grain is allowed to dry for a week. Successive coats of alkyd urethane are applied. Each coat has pigment in it (I used red, yellow and brown). This creates depth of finish. (If you look into a piece of real wood, you will see numerous color layers corresponding to the way that the tree grew.)
For added effect, I removed all the mortise locks from the doors, cleaned them up and found appropriate keys. I covered the exterior plates with fake gold leaf. They look very nice.
Click Here to learn about other Faux Finishes.In response to reader requests, here are the specifics of our Red mahogany finish:
- Prparation: First, remove all the locks (see below); if you can take the doors off the hinges, do so. Mask everything thoroughly -- you will be painting the woodwork a number of times, so the possibilities for error and spills are multiplied. A thorough masking is worth the investment of time. The tape will be up for quite some time, so get the kind of tape that doesn't adhere permanently.
- The primer was KILLZ interior
- The color base was mixed at Home Depot in 2001. The color is Behr premium plus interior wall paint 2A25-4, which is governed by this formula:
COLORANT OZ 48 96
F Red Oxide 2 8 0 - Cover the color base with a 'spit coat' of shellac: 1 part '8 pound cut' shellac mixed with 8 parts alcohol (full strength shellac is 8 pounds of flakes to a gallon of alcohol) The spit coat creates an interface between the ground and the graining medium.
- The graining medium is Minwax 'Red Mahogany' Let the can sit undisturbed for a week. Open the can, pour off as much liquid as you can without disturbing the pigment at the bottom. Mix the pigment with 2 parts Spar Varnish per part of pigment base by volume.
- Apply the graining medium with a soft brush. Let sit for 10-115 minutes. Create the pore structure of the wood by 'flogging' -- tap the medium briskly with the SIDE of a dry brush. Wipe the brush frequently. Work in straight grain with a disposable China bristle brush -- trim the bristles so they are only 1 inch long. Just run it lightly over the surface.
- On a door: do the rails (horizontal pieces) first, then the stiles (verticals) Be very careful about the joints, making sure that you are simulating credible woodwork. Last, create the 'hearts' on the door panels: mahogany hearts are long and narrow start with a small 'V' at the center and work outward use the edge of a dry brush and keep your strokes thin. Only the very rich could afford mahogany heartwood on their doors, so you are creating a very elegant piece.
- When everything dries thoroughly -- like 2 weeks! Buff with synthetic steel wool and apply several coats of matte finish polyurethane. Yes, this is like painting all your woodwork six times...
While you are waiting for the finish to dry, gold leaf the mortise locks.
- Carefully disassemble the locks, cleaning 80 years of dust and dead insects out of them. Carefully save all parts and screws! The mechanism for the lock is 100% self-evident.
- Let the cover plates soak in paint remover overnight. You will probably be stunned to see a wealth of intricate detail that has been obscured by 75 coats of paint. Wipe the cover plates with paint thinner and dry thoroughly.
- Mix up the 'size': one ounce of spar varnish and a little bit of red pigment. Apply the 'Size' to the cover plate; allow to dry for 6-10 hrs or until it is just tacky.
- Buy some fake gold leaf from a craft store. The sheets are incredibly thin and are handled by static electricity: take a 1" sable brush and rub it on your lapel. Then use the charged brush to lift the gold leaf -- carry it to the plate and drop it on the tacky size. Take a small sable artist brush and tamp the leaf onto the plate, pushing it into the details. With a bit of practice, you will be stunned at how easy it is...
- Spray the finished object with clear lacquer. Use a product like 'Liquid Leaf' to do the strike plates and hinges on the doors.
For a very small amount of $$ you will have transformed your woodwork into a turn of the century palace.
LIMED OAK
In response to another reader request, here are the specifics of a Limed Oak finish:
If you look at a pice of raw oak wood, you will see that it has very deep pores and a very coarse grain. It takes a lot of sanding, planing, etc, to get a smooth finish on oak. In the 16th century (or so) craftsment came up with a novel idea:
So, you must clean the oak or oak veneer down to the wood. If you have a shellac finish, this is done by applying lots of denatured alcohol. Buy a carton of paper towels and get a big trash can. Start with the top. Pour some alcohol on the finish and let it sit for a minute or so -- alcohol is the solvent for shellac. Wipe the dissolved finish off with a wadded up paper towel. Repeat many times. Then turn another side up (the alcohol will sit on a flat horizontal surface...) and repeat the process. You will use a gallon of alcohol, a case of paper towles and spend about three days doing this. Use q-tips and dental picks to clean out the fine details. If you have another kind of finish, you will have to use chemical strrippers. Wear saftey equipment and follow the directions carefully.
Wet the raw wood or veneer with water. This will raise the grain and make it more receptive to the plaster.
Generally, limed oak is done with a very light (almost gray) background to simulate weathering. Minwax makes a "driftwood" stain that will work nicely. Put several coats of stain on the veneer ( let it sit for about 15 minutes and wipe off the excess) When the veneer is a nice color, you are ready for the "liming"
Buy some real Plaster of Paris (you'll need about a quarter pound) Get the very best grade from a hobby store -- the kind for casting detailed statues. It must be ultra-fine so that the plaster will stay in the grain.
Mix the plaster according to the directions and then add an extra teaspoon of water to make it just a little thinner. Paint the mixture on the veneer going ACROSS the grain to force the plaster into the pores. Paint a thin coat over the entire surface. Wait a short while and then wipe the piece gently -- it can still have streaks (or a "haze") of plaster. The trick is to let the plaster harden in the grain.
Wait a day and DRY sand the piece with 150 grit sandpaper on a block. Sand WITH the grain The plaster will clog the paper, so plan on changing paper frequently... Periodically wipe the piece down with a DRY cloth and examine your results -- you want the plaster to stay in the grain. Use NO WATER. Keep everything dry!
With patience, you will get a dark piece with pleasant white patterns on it. Give a final wipe with a clean tack cloth and apply a "spit coat" of shellac -- 1 part shellac to 8 parts alcohol. This will seal the plaster. Then apply spar varnish. The first coat should be thinned 50% and the next two coats should be full strength.
Flow the varnish on and be particularly careful not to allow buildup at the edges. If you can afford it, use a sable brush (they do not "shed" fibers). Keep your strokes long and with the grain. Let each coat dry thoroughly -- sand the first coat with 150 grit paper, the next coat with "00" steel wool and the third coat with "000" steel wool. Apply auto rubbing compound and then wax with any good car wax (Simoniz works just fine) -- that is, paste wax in a can, not stuff in a squeeze bottle)
Yes, this takes a lot of time! That's what fine furniture is all about. That's also why you don't see much real limed oak around. You CANNOT (repeat "CANNOT") use any water based products (like urethane...) because they will dissolve the plaster!
When you get done with this, you will appreciate why, on the "Antiques Roadshow" program, they say "The piece is ruined if you even touch the old finish..." The labor that goes into doing wood finishing correctly is astonishing. If it's any consolation, this is EASY compared to French Polishing (42 steps) or Water Gilding (106 steps).
Handy Hints from Popular Mechanics
Our search throug all the issues of Popular Mechanics in the years 1932 through 1939 has turned up a number of first rate shop guides that are still relevant today. We have scanned these as ".pdf" files which are available for you to download below:
- Selecting and Caring for Brushes
- Applying Finish to Wood
- Novelty Finishes
- Wallpapering
- Silk Screen Techniques
- Buffing and Polishing
- "Turn Right" -- all about Lathes
- All about Drills
- Wood Joints
- Rough Sawing
Click here to look at another type of collectible
Counter for the Entire Website - not just this page