A 1948 Model Airplane Kit
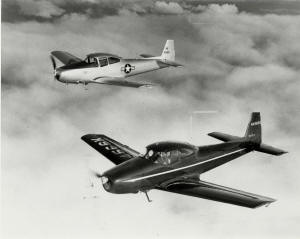
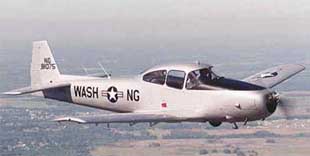
The Ryan Navion

Join Us on Facebook
The Air Age in Miniature

Our treatment of model aircraft began as an account of my trials and tribulations in building a 1948 airplane model kit. Since then, we have developed a wealth of information about model kits and contests during the "Air Age" so much, in fact, that the page would not load quickly. On November 25, 2009 we split the material into four segments, corresponding to the four boxes or "buttons" below. If you came in from a search engine looking for something very specific, click here for the Analytical Index that will enable you to find a specific topic.


Click to look at all the covers of Model Airplane News from 1929-1969.
For those of you who don't like buttons, go to the analytical index to find just what you're looking for.
Hello! Welcome to our page about building a balsa wood model of the famous Ryan Navion airplane. Since you may have come here with a specific purpose, here are some helpful shortcuts
- My Experience with Balsa Wood Airplanes
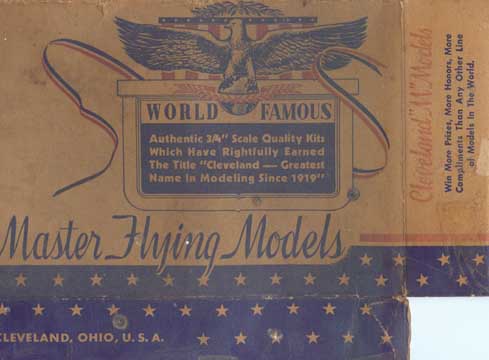
- The Cleveland Model Airplane Company
- Building the Navion
- Reader Comments
This is part of a general Retro Lifestyle/Swing Dancing website. We have a Guide to 1940s Treasures and a Swing Dance Calendar for Washington DC.. Please feel free to Contact Us if you'd like to comment on the golden age of balsa wood models.
My Experience With Balsa Wood Airplanes
When I was a kid in the 1950s, I learned how to make model airplanes. I used to hang out at the athletic field next to St. John's church in Bloomfield. This was not a lovely grass covered area, but rather an oiled dirt playing field. On Sundays, teenagers and men would gather to fly gasoline-powered model airplanes. This was a fascinating experience that captivated me. After some interaction with the modelers, I learned that the Boys Club offered lessons in making models for little kids. So, I started out there. It wasn't long before I heard people talk about the famous "Cleveland Model Airplanes." These were incredibly detailed models that took a high degree of skill to make. They also cost a dollar when the simple kits we made at Boys Club cost a dime. My teachers suggested that I stick to the "kids kits."
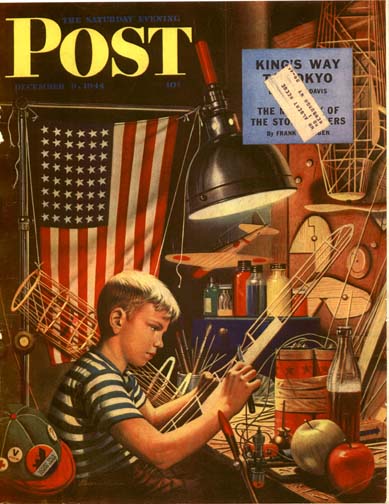
All Boys Were Expected to Make Model Airplanes
Cover, The Saturday Evening Post December 9, 1944
This was, of course like waving a red flag at a bull. Back then, my parents were very poor, so asking for a dollar for a model airplane kit that people said I couldn't make was out of the question. I had to hustle a lot to get the dollar. At that time, you could get a nickle if you carried groceries up five flights of stairs. The deal was cinched when I actually found a quarter on the street outside a bar.
I walked into Pop Target's candy store --- for some reason, he stocked a wide variety of model airplane kits --- and plunked down my dollar for a Cleveland Kit, this time a World War I German fighter plane called the Fokker D-VII. I took this back to the Boys Club and worked on it every day for the hour we were alotted. It actually took two years to finish. During that time, I actually got promoted to be one of the "helpers" for new kids. When I finished it, Mr. Ravignoli (the teacher) took a picture of me. He sent the picture to Model Airplane News which was the holy scripture of aircraft fans. The picture and the letter that I received from William Winter are shown below.
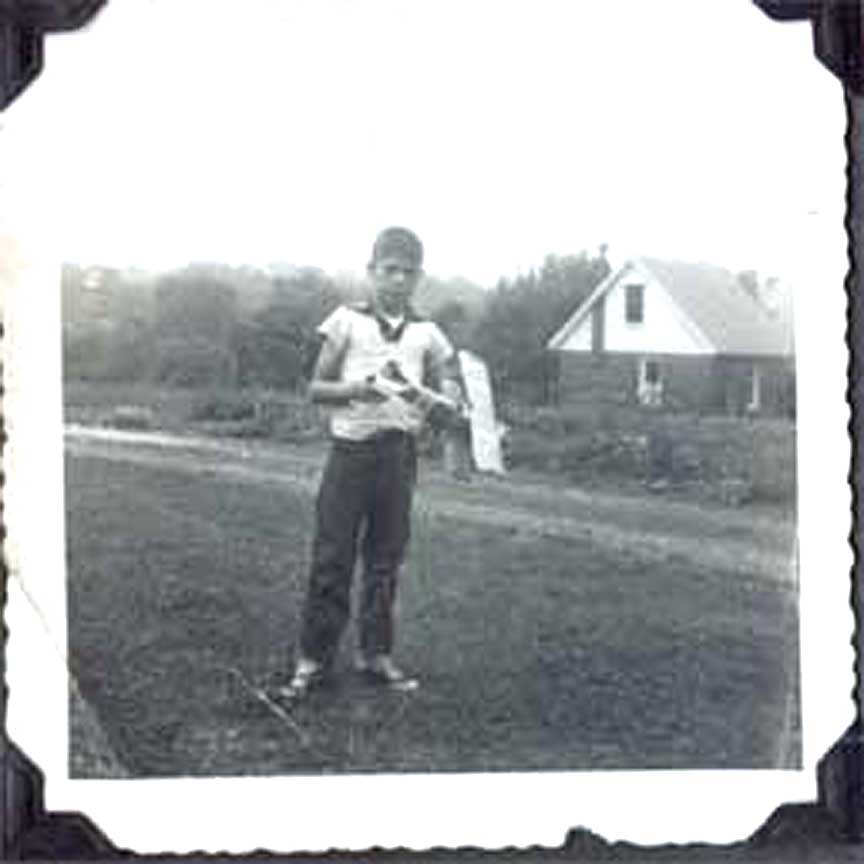
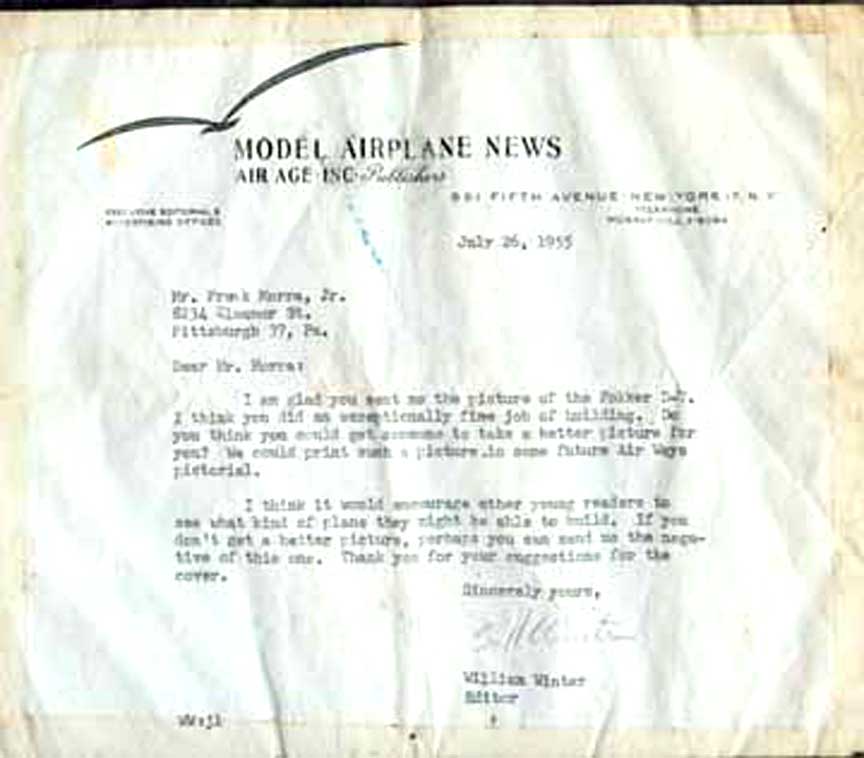
My 1955 Rendition of the Cleveland Fokker D-7 Kit
William Winter was the Dean of Aircraft Modelers at the time
Click to Enlarge
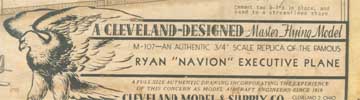
After that, Mr. Ravignoli gave me a gift -- it was another Cleveland kit. The subject was the famous Ryan Navion executive plane which also saw military duty as the L-17 scout. He said that he had had the kit for several years and didn't have time to build it. Recently, I discovered that the kit was made in 1948. I took it home and put it away to start on as soon as possible.
Meanwhile, my parents moved to the suburbs, and I developed other interests like radios, sports, and cars. The kit remained in the back of a drawer and every time I saw it, I said to myself, "I'll get around to that soon."
Fast forward to 1969. I was involved in a major auto accident and managed to break both my legs. The prognosis was two months in bed. So, I called upon my dad to bring the Navion Kit to me. He helped me set up a work board that I could use in bed and I began work on the Navion.
I got most of the components complete by the time that my convaescence was up --- wings, fuselage, empennage, etc., etc. Alas, I have no pictures from this stage. When I could walk again, I found that I had missed nearly two months of graduate school and had a lot to catch up with. So, I carefully wrapped everything up in tissue paper and packed it in a wooden box that had once held shotgun shells. I used liberal amounts of confetti to preserve things and nailed the box shut. First, I had to prepare for my doctoral qualifying exams, and then write a dissertation. Then I got my first job all the way in Los Angeles, then to Palo Alto, then to Charlottesville, and finally to DC. All the time, the wooden box carefully accompanied me. It finally got stored on a shelf under a stairwell in my current house in about 1974. It rested there gathering a liberal amount of dust until I discovered it in 1999. In January of 2003, I finally decided that it was about time to complete the model
The kit has been around for 55 years. Mr Ravignoli held it for 7 years, and I have dithered with it for 48 years. That must set some record for procrastination!
It IS going to be finished and I invite my readers to follow in the process
You will first, however, allow some background expository materials
Cleveland Model & Supply Company, the oldest, continuously-operating model airplane company in the world, was founded in 1926 by Edward T. Pachasa (later Packard). Mr. Packard started the business with his four brothers, his mother and father in their residence and a converted barn near West 57th Street and Bridge Avenue, on the west side of Cleveland Ohio.
During World War II, company sales hit their peak, with 1944 sales of about $7.5 million dollars, in today�s economics. At that time, the company was the world�s largest manufacturer of model aircraft and far outsold its nearest competitors. In the 42 years of full-time kit production, the company manufactured nearly 50 million kits, with more than 2,500,000 of the Cleveland Condor, alone, being sold. In addition, the company developed over 500 designs and employed more than 2000 people; at several times more than a 100 individuals. On 20 February 1999, Mr. Packard passed away.
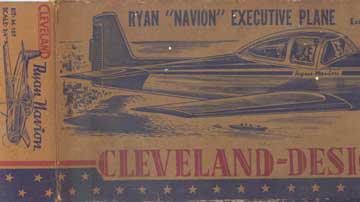
The Original Box
A Big, Strong Cleveland Box, if you will...
Legend from the Plans
Made in 1948
The NAvion was the first civilian aircraft manufactured by North American Aviation after ceasing production of the P-51 Mustang of WW II fame. 241 military NAvions were built for liaison, reconnaissance, personnel, and light cargo-carrying duties and were given the designation L-17.
On the Cover of Model Airplane News
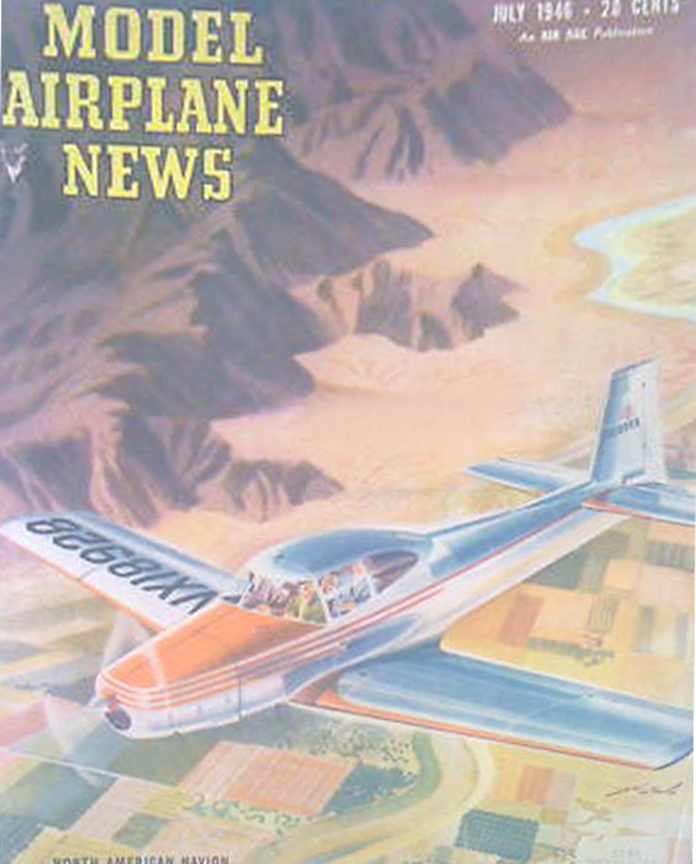
North American Navion
Model Airplane News Cover for July 1946
by Jo Kotula
Click to Enlarge
Three models of L-17s were built. L-17A models were manufactured by North American Aviation, L-17B models were build by Ryan Aeronautical Company after they acquired the rights to the NAvion (and L-17) in July, 1947. L-17C models were L-17As that were updated and fitted with B model features such as an auxiliary fuel tank. Used for a variety of purposes by the USAF and U.S. Army Air Forces, it was pressed for a time into front line service during the Korean War for Forward Artillery Control (FAC) Rumors hold that L-17s were even used as light attack aircraft with bazookas wired underneath the wing or 5" rockets mounted on hardpoint. No evidence has been found to support this. Unsuited for this duty, it quickly moved into a support role, hauling light cargo and personnel. Both General Douglas MacArthur and General Ridgeway had personal L-17s. After the Korean War, most L-17s were released to "hack" duties and finally released to the Civil Air Patrol or Air Force/Army Flying Clubs before entering civilian hands.
The NAvion is experiencing a resurgence based on it's rugged design, excellent flying qualities and availability of a broad range of speed and utility modifications. However, few of the current generation of NAvion owners are aware of its military heritage. Although 241 L-17s were manufactured less than 50 are registered today, very few of those are in military colors and virtually none in an original configuration.
In addition to the cover of Model Airplane News, this airplane was also featured in the WINGS "Friend or Foe" trading card series of the early 1950s
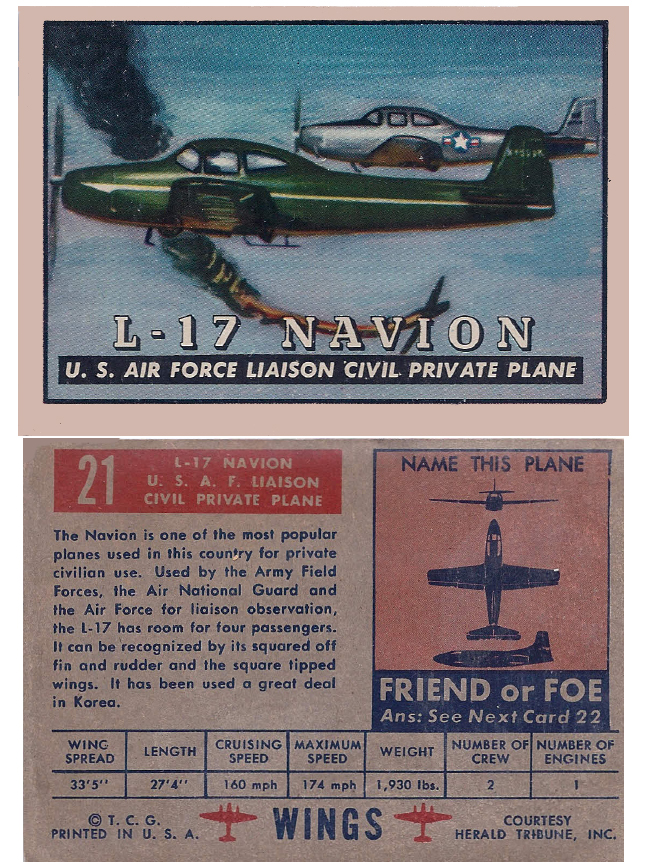
Trading card representation of the Ryan "Navion"
Click Here to see all 200 cards in the series
Click to Enlarge
It is, indeed fortunate that the Navion is undergoing a renaissance --- I was able to buy a copy of the 1948 Service Manual and a wonedrful Parts List which shows every part on the Navion in extensive detail. As you will see, we have made great use of these documents.

Navion, Civilian Version
Model "A"
Navion, Military Version
Designated "L-17"
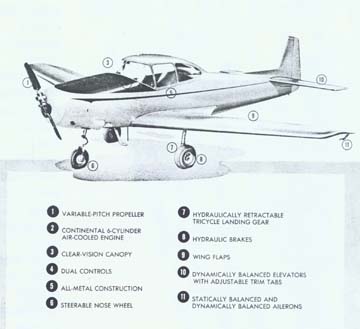
Features of the Navion
From the 1948 Service Manual

Three View Drawing of the Navion
From the 1948 Parts List
When I started this, I didn't have a camera or a website and most American men knew how to make a model airplane out of balsa wood. Many people don't even know what balsa wood is, so listen up:
Balsa trees grow naturally in the humid rain forests of Central and South America. Its natural range extends south from Guatemala, through Central America, to the north and west coast of South America as far as Bolivia. However, the small country of Ecquador on the western coast of South America, is the primary source of model aircraft grade blasa in the world. Blasa needs a warm climate with plenty of rainfall and good drainage. For that reason, the best stands of balsa usually appear on the high ground between tropical rivers. Ecquador has the ideal geography and climate for growing balsa trees. The scientific name for balsa wood is ochroma lagopus. The word balsa itself is Spanish meaning raft, in reference to its excellent floatation qualities. The secret to balsa wood's lightness can only be seen with a microscope. The cells are big and very thin walled, so that the ratio of solid matter to open space is as small as possible. Most woods have gobs of heavy, plastic-like cement, called lignin, holding the cells together. In balsa, lignin is at a minimum. Only about 40% of the volume of a piece of balsa is solid substance. To give a balsa tree the strength it needs to stand in the jungle, nature pumps each balsa cell full of water until they become rigid - like a car tire full of air. Green balsa wood typically contains five times as much water by weight as it has actual wood substance, compared to most hardwoods which contain very little water in relation to wood substance. Green balsa wood must therefore be carefully kiln dried to remove most of the water before it can be sold. Kiln drying is a tedious two week process that carefully removes the excess water until the moisture content is only 6%. Kiln drying also kills any bacteria, fungi, and insects that may have been in the raw balsa wood.
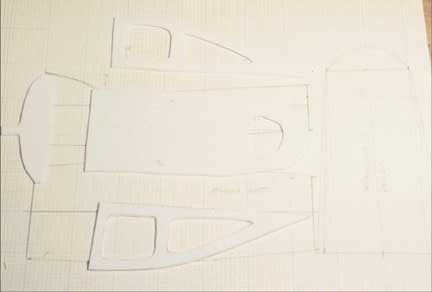
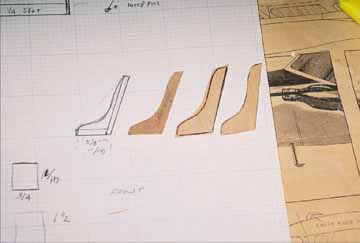
With that in mind, the essential parts of building any balsa wood model are (a) The Plans and (b) The Parts. The Plans are a detailed set of drawings that are the exact size of the model with instructions on where the parts go. The Parts allow you to build three dimensional shapes out of flat pieces of balsa.
The major difficulty here is that the parts come printed on a sheet of wood. YOU have to carefully cut them out with a razor knife and sand them to the exact shape of their outline. Cutting the parts generally takes a LOT of time. The parts are printed to minimize the amount of wood used and NOT to conform to the grain of the wood. You have to have a lot of razor blades, sandpaper and patience. The Parts (Formers for the fuselage and Ribs for the wing and tail surfaces) are sort of like cross-sectional slices of the airplane. Thin strips of balsa called Stringers are used to form the external shape of the plane. This skeleton is covered with tissue paper, fabric or thin sheet balsa to have the final appearance of the plane. At one time, real airplanes were made this way.
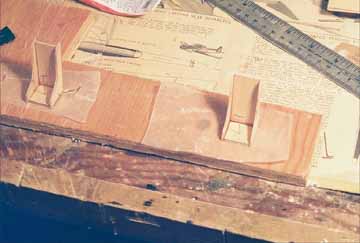
Because the plan is an exact drawing of the model, it is directly used to assemble the parts. Waxed paper is put on the plan and the various parts are assmbled, held to the plan with straight pins and then glued in place. This part is pretty straightforward
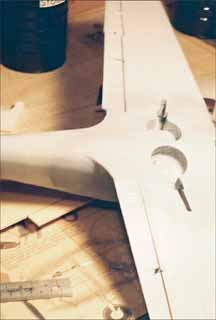
The wings have gentle curves and may be covered with very thin sheets of balsa. The Fuselage has more complex curves and must be finished in a much more time-consuming fashion: individual pieces of balsa are fitted to each of the hundreds of rectangles demarcated by the formers and stringers. When all rectangles are filled, the fuselage is sanded to a smooth and aerodynamic surface.
I had reached this point when I put the model away in 1969.
Here is another Collector who has put together a retrospective on ALL the Navion model airplane kits that have been offered.

Section of the Plan
Parts are directly pinned to this plan
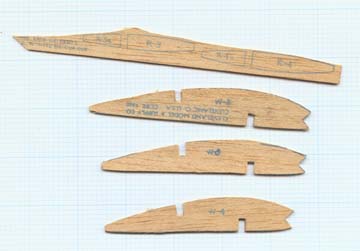
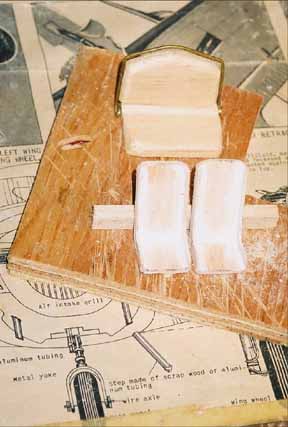
The Parts
Showing parts printed on wood and then cut out
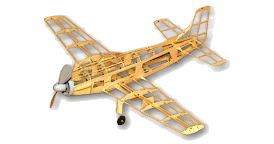
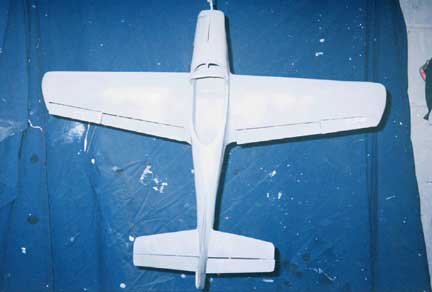
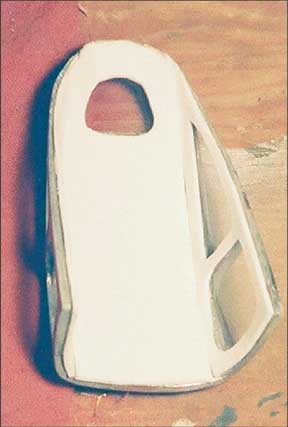
The uncovered plane
This is what it might look like without the covering
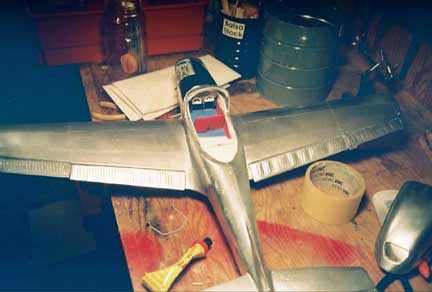
When I unwrapped the parts in January of 2003, I found them to have survived in excellent condition. I began the process of assembling the individual pieces into something that actually looked like an airplane.
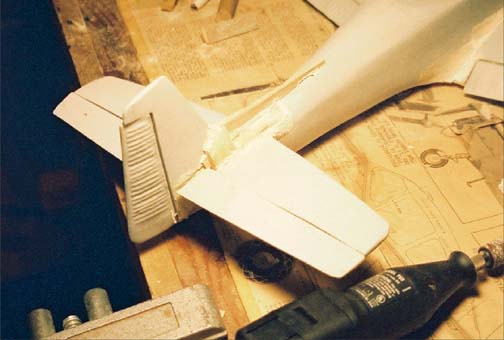
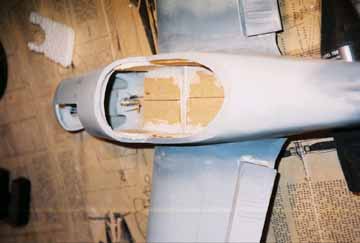
One of the most difficult parts of this process is creating the fairings, or the aerodynamic smoothing parts where the wings join the fuselage. This is a complex curve that is approximated only gradually.
The assembled parts
The light colored blocks show the fairing
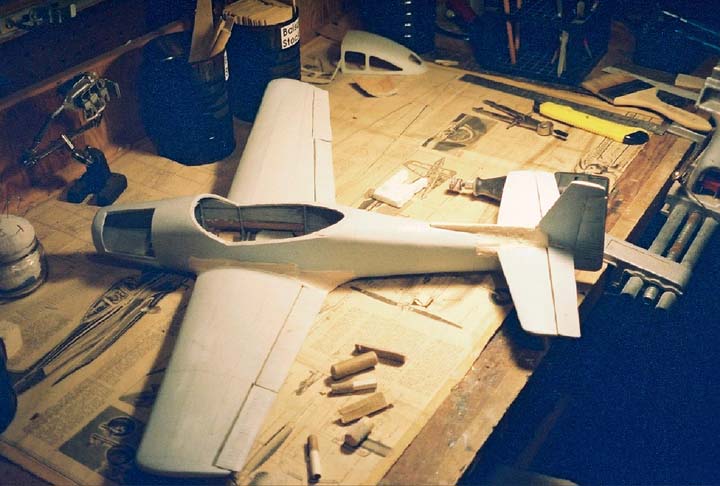
The Empennage
The fairing has yet to be shaped
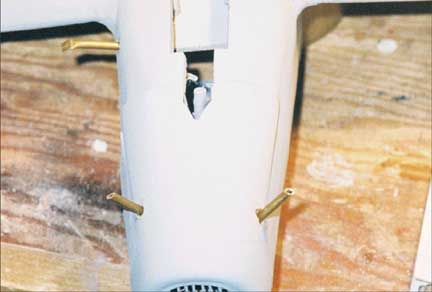
Undersurface, showing landing gear wells
The wells were made out of Tylenol bottles.
Priming, ready for paint
Several coats are helpful
A Pounce Wheel was used to simulate rivet paptterns
The sharp spikes of the wheel make a regular pattern
Adding final small details
Exhaust Pipes and a Step to enter the plane
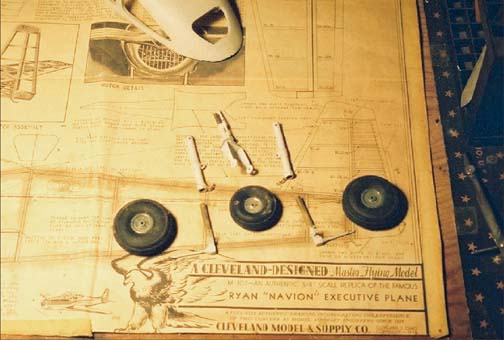
Having procrastinated for 48 years, I decided to go all out in versimilitude. My first line of attack was the landing gear. I was able to find that my local Hobby Center had a vast array of wonderful brass wire, sheets and tubing that could be used to simulate the hydraulic mechanism of the gear.
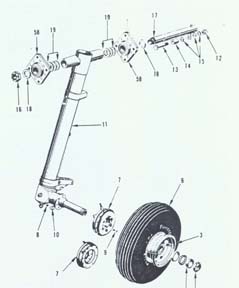
Main Landing Gear
Retracts into the wells on the wings
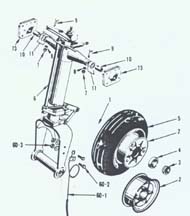
Nose Gear
Used for steering as well as 3rd point of contact
Landing Gear for the Model
Replicates the major parts and functions
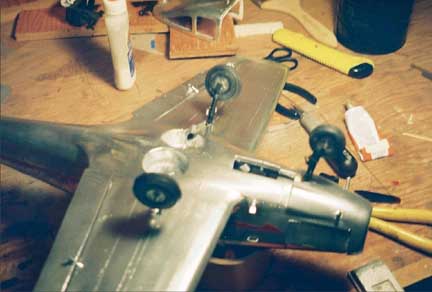
Installing the Landing Gear
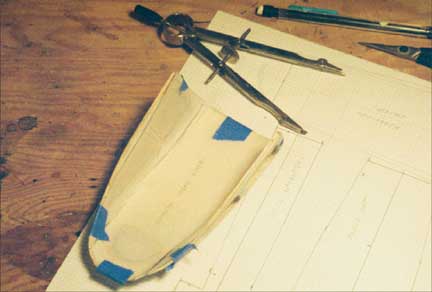
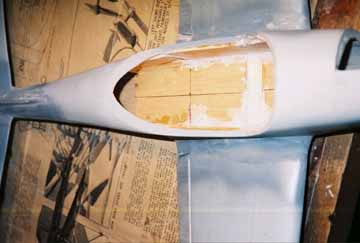
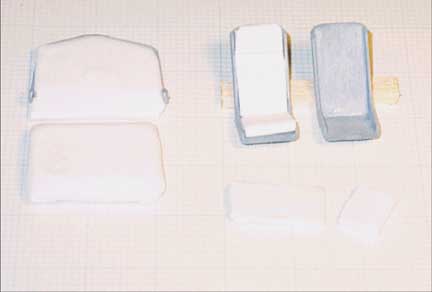
The canopy is a major feature of the Navion. It is very distinctive and has a very complex shape. The original Cleveland kit gives you a big block of balsa and a drawing. Your job is to get busy carving. Accordingly, I cut the block of balsa to the exact dimensions of the canopy. Then, I traced side, topa and front views of the canopy onto the block. Then I began to carve, carve, carve until I produced a convex surface about an eighth of an inch thick. Lots of razor blade and sandpaper were used.
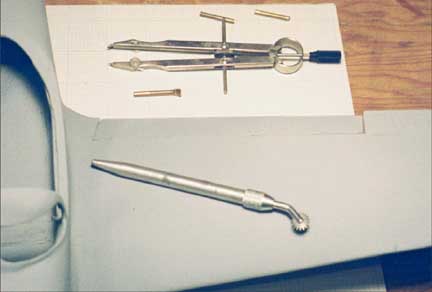
The windows are supposed to fit into a channel in the canopy. If this was full size, the channel could easily be cut with a router. Alas, this piece is about 2 inces wide and made of delicate balsa. Accordingly, I had to make the little tool shown inthe picture to accomplish this task. It took a long time.
The actual windows are made out of thick plastic (I used the package that a Firewire came in). I made patterns from the plan and fit them to the exact shape of the recesses that I had routed. The windows get set in when the painting is complete. The canopy gets a headliner just like the real thing. In this case, the headliner is made from Darice Foamies, fun brightly colored 2mm thick foam sheets that are generally used for children's crafts. Lots of careful measurement with dividers was required. A pattern for the headliner was made out of tracing paper and adjusted for fit; the paper pattern was then transferred to the foamies to create the final parts.
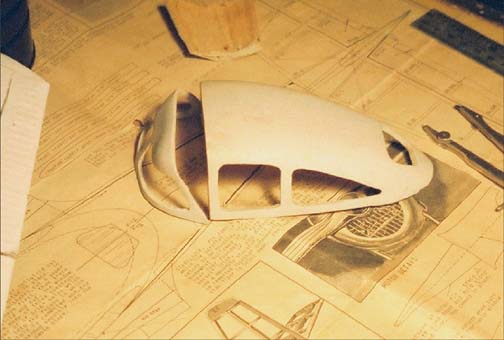
The Canopy
Carved from one block of Balsa
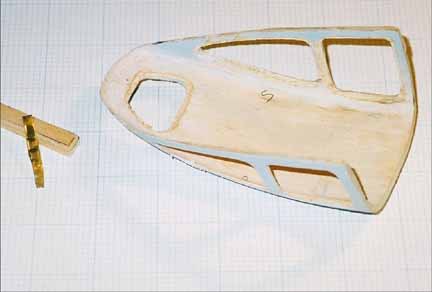
Routing for the Windows
The special tool is shown...
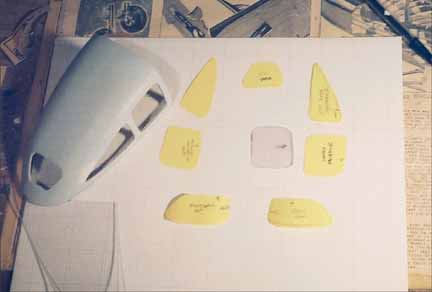
The windows
Patterns (yellow) for tracing on plastic
Measuring for the Canopy Headliner
Dividers are helpful on curved surfaces
Canopy Headliner
Custom fit

Installing the Windows
Gasket Sealer worked just swell as an adhesive
Installing the Headliner
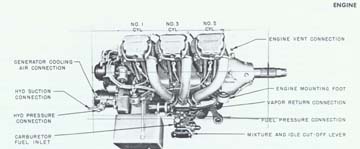
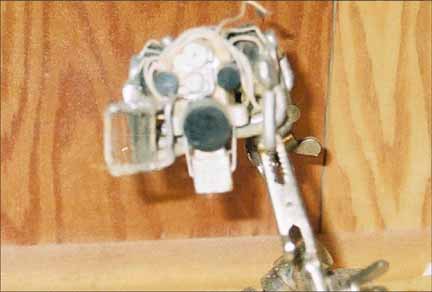
The original Navion was powered by a six cylinder overhead valve, horizontally opposed, direct drive Coninental (Type E-185) engine. The Service manual contains several photos of the engine, so I thought that I would try to replicate it. With application of time and patience, I managed to cobble a reasonable replica out of balsa, wire, dowels, and other odds and ends.
Continental E-185 Engine
Exploded View
Continental Engine
Port View
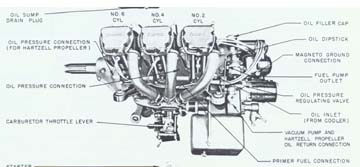
Continental Engine
Starboard View
Replica Engine
Balsa, wire, dowels, odds and ends
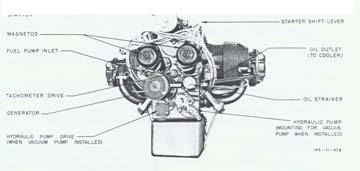
Continental Engine
Rear View
Replica Engine
Rear View
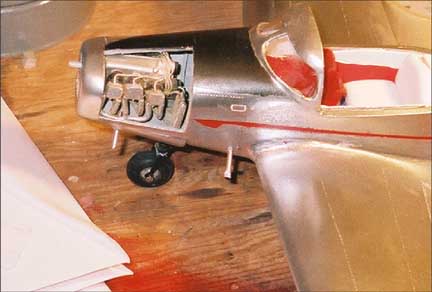
Model Engine mounted in the Hood
The interior of the plane is very important to the realism of the final model. Accordingly, I chose to develop the interior strictly according to the parts manual. The work began by installing side panels in the cockpit area. The floor was constructed to match the diagram. The "hump" in the floor covers the landing gear wells
Next, I tackled the seats. The front seats are metal shells that have foam upholstery in them. By making patterns based on the drawings (and measured to the model), I was able to build up the front seats as shown in the photos. The rear seat in the actual plane folds down to accomodate luggage. Our scale model seat does the same thing.
The control console and dashboard has been completed and is shown below. This has been constructed as a stand-alone subunit to be installed after painting is complete. Steering yokes have been constructed out of plastic rings (normally used for knitting) with some balsa inserts.
The interior lining was modeled on the real thing. We chose a spiffy red, white, and blue motif. Careful measurements were made and paper patterns were constructed; as with the canopy headliner, the paper patterns were transferred to Foamies. The two-tone side panels were joined with simulated "tee" moulding made out of aluminum foil. The interior decorative panels will be installed after painting is complete
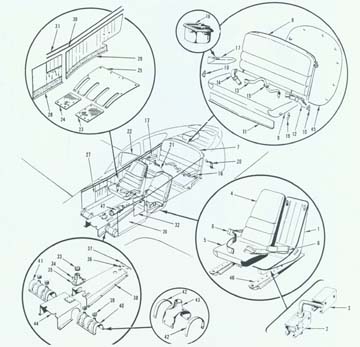
Navion Interior
From the 1948 Parts Manual
Building up the Interior
The "hump" covers the landing gear wells
Making the seats
The back seat reclines
Upholstery for the Seats
The back seat still reclines...
Navion Cockpit Detail
From the 1948 Parts Manual
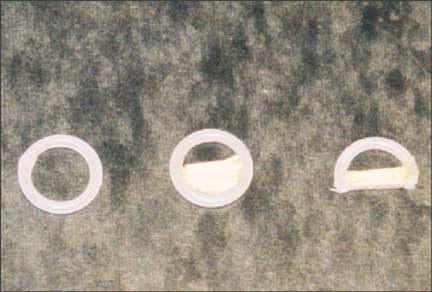
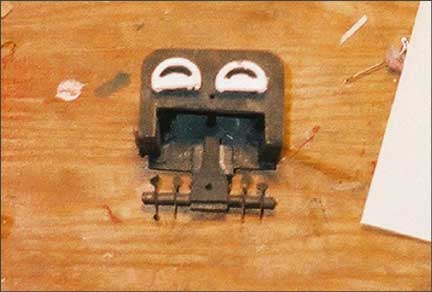
The Steering Yokes
Plastic rings with balsa inserts
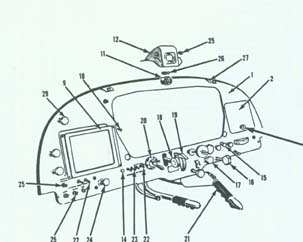
The controls console
Dashboard and rudder pedals
This is what the REAL control panel looks like, courtesy of our friend Jason Vosbergh who owns Navion Serial #6 (Built July 6, 1946!)
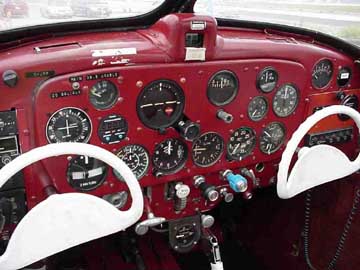
The real thing
We came pretty close!
Console with the steering yokes mounted
Gasket Sealer worked just swell as an adhesive

Paper and cardboard patterns for the Interior Panels
Careful fitting is necessary on complex surfaces
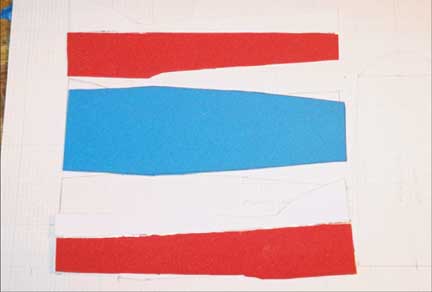
The interior lining
nifty red, white and blue color scheme
Installing the Interior panels
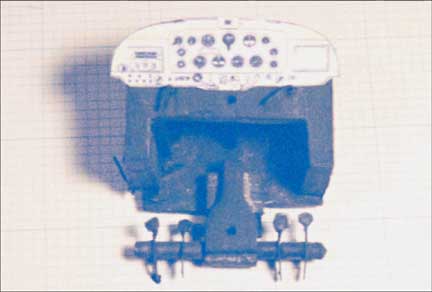
View of the Cockpit
Console, Front Seats installed
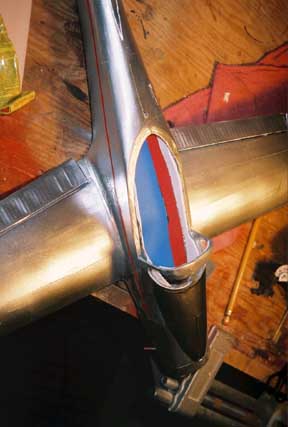
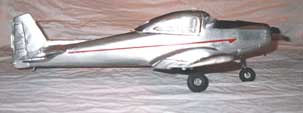
As we head down the home stretch, it was time to paint and decorate the model; after this, all the interior trims and final details would be added. The model was painted with three coats of Rust-Oleum Chrom spray lacquer. This does a wonderful job of simulating an aluminum finish in scale (aluminum paint is too dull). The trademark Ryan "arrow" was painted on the side after an elaborate job of masking.

Masking for the stripe (1)
The trademark Ryan "arrow"

Masking for the stripe (2)
It got complicated
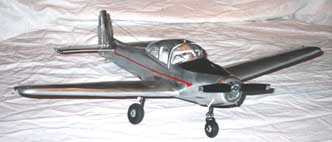
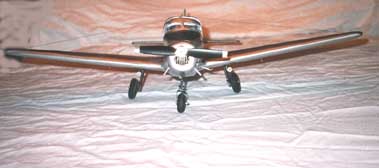
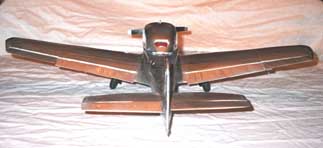
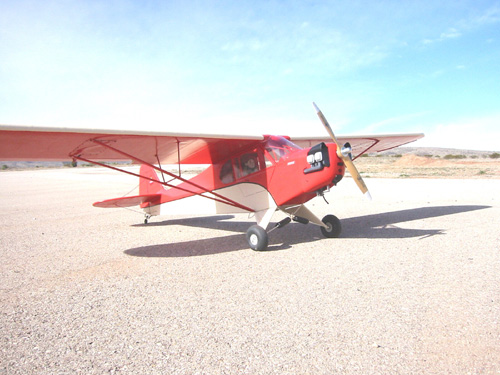
On April 8, 2003, I put the finishing touches on the model! I am thrilled with it!
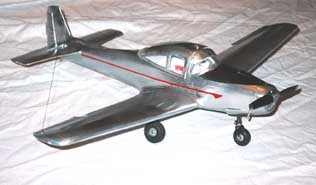
Which one is the real thing?
[OK, so it's obvious... this started out as little pieces of wood.]
Here are some more pictures of the Model
On February 27, 2005 wer received the follwing note from our friend Frank:
"... just read with avid interest your Navion model building story and I appreciate the fine work you have done to make it a reality. I am probably one of the chosen few who actually spent an afternoon in the back seat of the full size version and would like to share my small adventure with you. BTW I have been a aviation buff and modeler since I was ten, I'll be seventy next month! This plane has always had a spot in my heart and perhaps I may make an RC version of one. The story is as follows, In 1952 while living in New Jersey I belonged to a CAP chapter in Paterson. Since I was taking flying lessons at the time in a J-3 Cub which BTW, I just finished modeling in 1/4 scale, of my training plane, see pics, which carry the same registration numbers. The airport I flew from was a small grass/paved field called Totowa-Wayne Airport and about a half mile from my house in Mountain View. One day following a winter flight session, I was asked if I wanted to be an observer in a CAP air search for a downed plane in the N. New Jersey mountains. Well of course I did! As it turned out the plane I got to fly in was this beautiful maroon and white Navion! The plane was hangered at same airport I was flying from and I have never forgotten that flight. I spent 24 yrs in the USAF as an electronics type and have had other memorable flights as well as you can well imagine. I finally soloed in a Aeronca Champ at Clover Field, Friendswood, TX. Another memorable flight was in the glass nose of a B-25, a night flight from Newark Airport to Dulles Field, Washington DC and on to Langely AFB coming in over the Cheasapeake Bay! I hope you enjoyed the story and the pictures from the RC Airport 5 miles NW of Carlsbad, NM. I have resided here since 1981. ..."
Of all things, there is a link between Swing Dancing and the Navion. Specifically, bandleader Ralph Flanagan was a pilot and Navion owner.
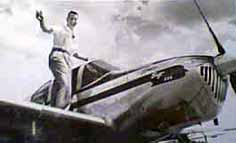
Ralph Flanagan and His Navion
Flanagan was popular in the period 1948-1952 and was more successful as an arranger and producer than as a performer. The most popular recording of his band was a very danceable takeoff on the old spiritual Joshua [Fit the Battle of Jericho].
Join Us on Facebook
Counter for the Entire Site (not just this page..)
Home | About Lindy | 1940s Collectibles | Upcoming Events | Vintage Clothing
The Guide - Establishments - Travel - Accessories
Music | Links | Photo Gallery | Extras | Contact