The Philco Radiobar
A Unique Swing-Era Icon
In the early days of October, 2001 we attended the Clarendon Days festival. (this is a negighborhood in a near-suburb of Washington, DC.) This was a day of fun, food, music, and friends, including Cherri Harris, Jen McDuffie and Deb Ahern. As part of the street festival, a number of antique vendors had set up shop. Most of the stuff was fairly mundane. At the edge of the fair, we spotted what looked like a console radio. Closer inspection revealed a true treasure --- it was a Radiobar with a PHILCO radio.
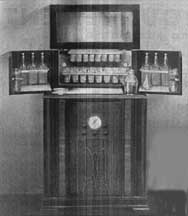
Here's what it looked like
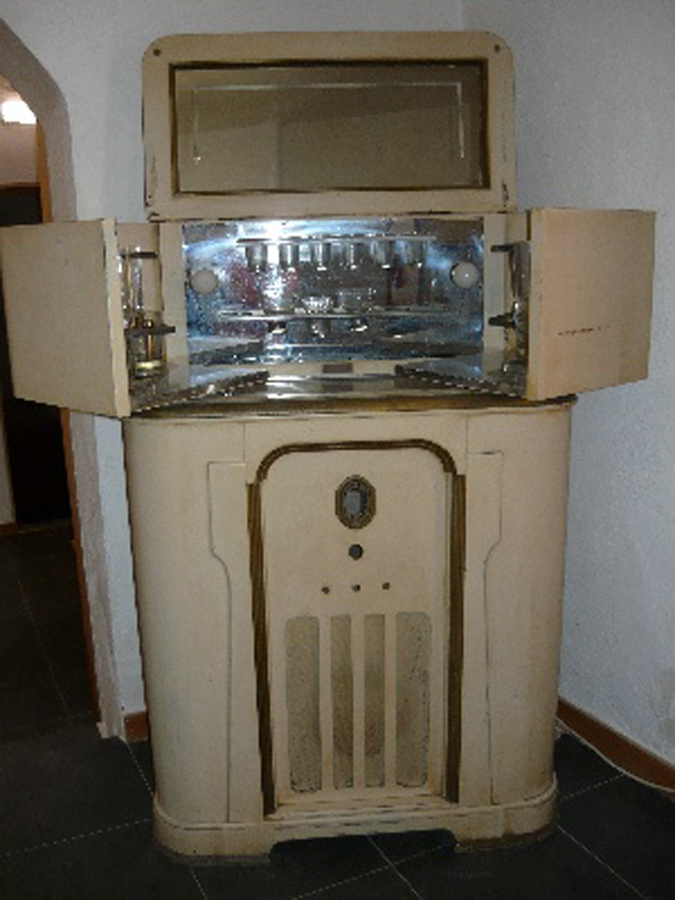
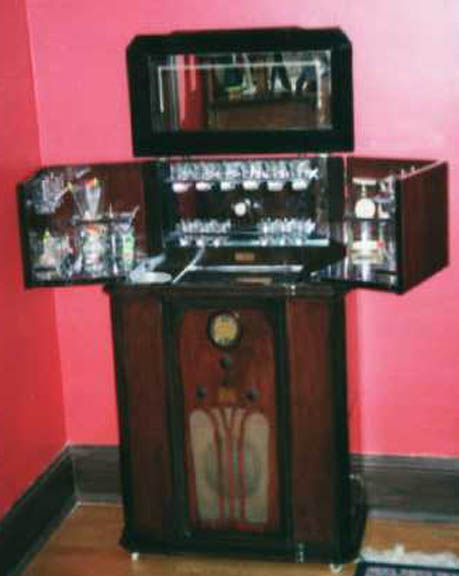
The Radiobar, As Found
(Left) front view, closed
(right) Front view, Open
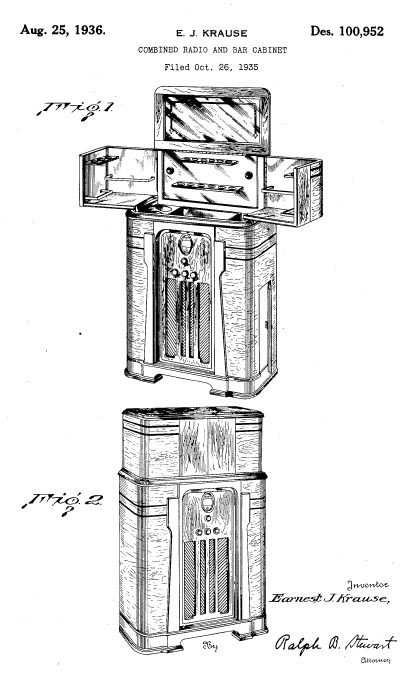
Radiobar Design patent D-100,952
It may have belonged to a mobster named "Clams" Casino
Click to Enlarge
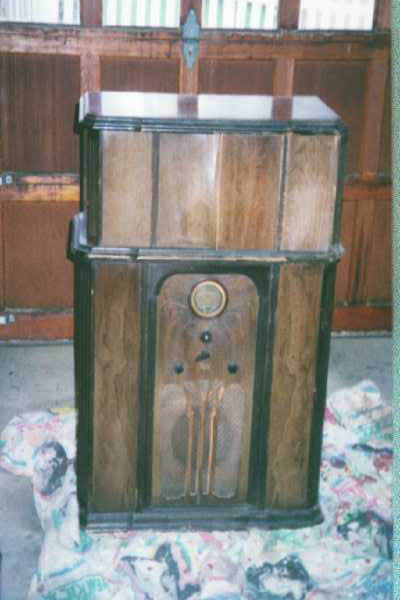
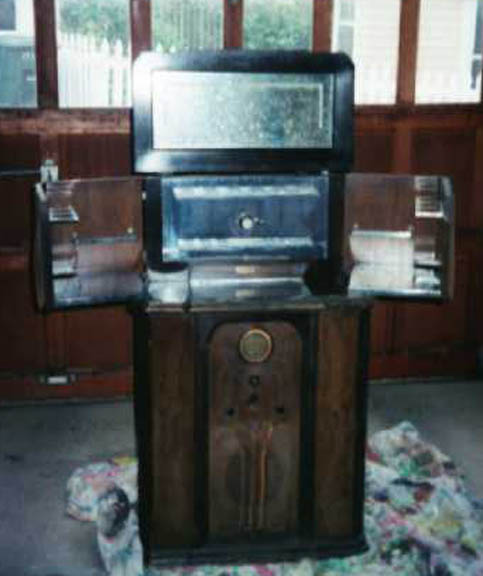
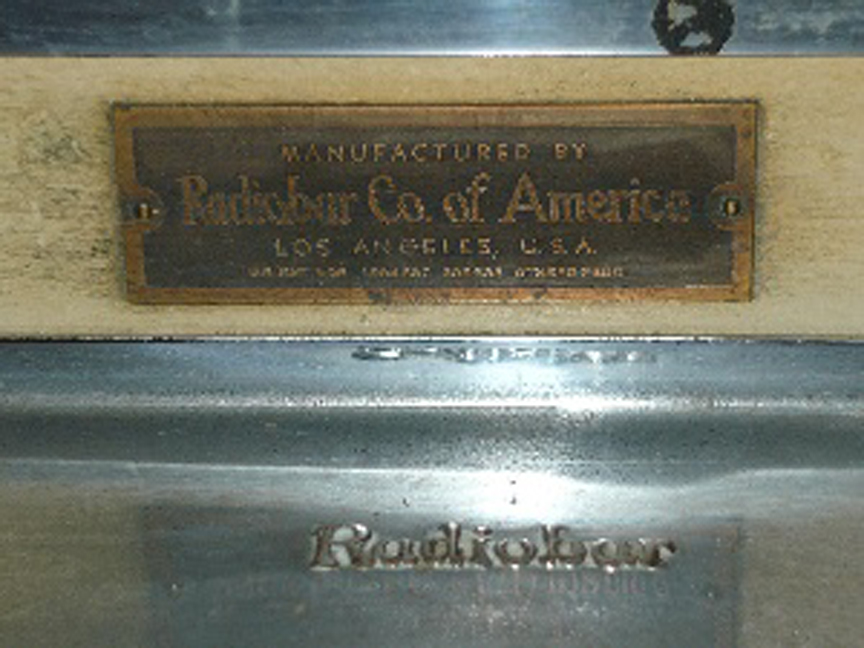
As you can see, it just looks like a more-or-less common console radio. But, appearances can be deceiving, as shown in the "open" view: This is a radio and it is a cocktail bar, just the kind of thing that you would expect to find in the office of a sophisticated gangster. They were made during the 1930s and 1930s by the Radiobar Corporation of America, in "Los Angeles, USA".
Radiobar first appeared sometime around 1933 in Los Angeles. The company was also associated with a New York company of the same name. Ads from the period list the company at 7100 McKinley Ave., Los Angeles, and 13 East 47th St., New York. The company was owned by Earnest J. Krause (1897-1970). Click here for a picture of Mr. Krause's original patent drawing for the Radiobar.
The sets used either a Zenith or Philco chassis until the late 1930's when the company merged with Philco and then only Philco chassis were used.
A RadioBar with a Zenith Radio
...Probably from 1937 - that is NOT a shutter Dial
Click to Enlarge
The advertisement in Radio Craft called Radiobar, "America's New Radio Sensation!.""and, according to the ad, the models could be purchased with short-wave only (19 to 50 meters) as well as AM/SW, or the just the cabinet with the bar could be purchased without the radio.
The Radiobar was aimed at the more affluent of the Depression years; built to look like a fine piece of furniture, it presented a novel way to conceal the cocktail bar. This example has a PHILCO radio in it.
You can see an example of a Radiobar in action in the film Angels With Dirty Faces. The film stars James Cagney, Huphrey Bogart AND Pat O'Brien (as well as the Dead End Kids), making it one of the most remarkable formula gangster films of all time. The Radiobar makes its appearance early in the film ats the focus of attention in the office of corrupt mob boss Mac Kiefer (George Bancroft). The iconography of Warner Brothers gangster films required that the Big Boy decorated his office with impeccable Style Moderne props. You'll get a kick out of the Radiobar and the clothes chosen by the Dead End Kids when they come into some "dough". You'll fight back a tear when Father Jerry (O'Brien) convinces tough guy Rocky (Cagney) to fake cowardice on his way to The Chair in order to redeem the Dead End Kids. (It didn't work -- Leo Gorcey and Huntz Hall went on playing dumb teenagers until they were in their 60s.)
A Radiobar makes an appearance in Gold Diggers of 1933, which is better known for its Busby Berkley production numbers such as "We're in the Money", "By a Waterfall with You", "Pettin' in the Park", and "Remember My Forgotten Man". The Radiobar is seen when "gold digger" Carole (Joan Blondell) puts the moves on Jonathan Bradford (Warren Williams) in her art-deco styled flat
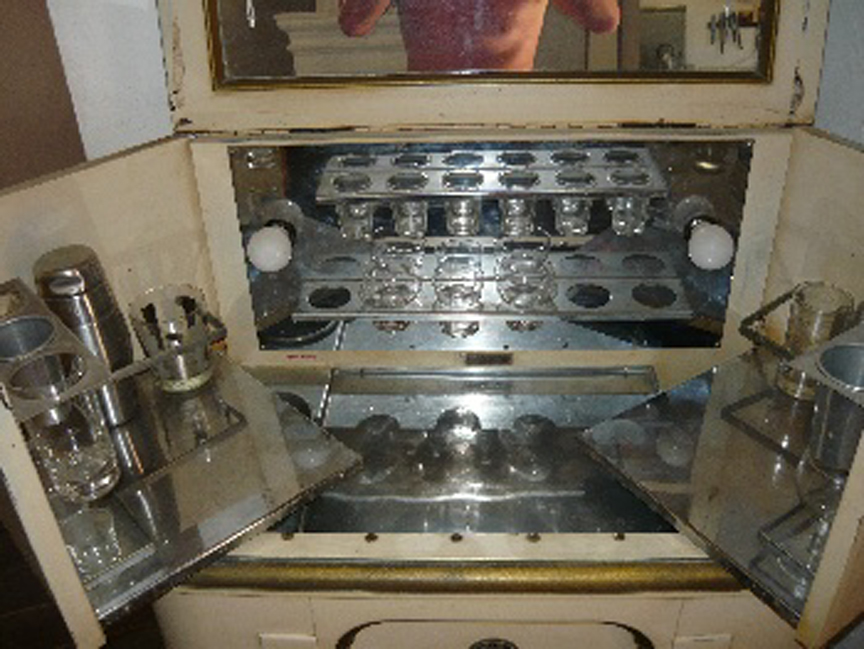
Below, are some photos of a RadioBar in good, unrestored condition that were sent in by one of our readers, Deb in Toronto. She writes:
" ...I was facinated by your website on the restoration of the radio bar because we too are about to restore one. My grandfather purchased a Philco Radiobar in the'30's and we were 'told' there were only 3-5 made (that isn't so, the correct figure is about 10,000). I have all the glasses and shakers and just had the radio repaired with new tubes. I have attached a couple pictures of my bar. I wanted to tell you what a great web page this one is and how valuable it will be to my husband when he starts the restoration!!!..."
Radio Bar Photo sent in by Deb in Toronto
...Probably from the late 1930s
Click to Enlarge
Here are some photos of a Radiobar as found in an attic by our friend Jan. This unit looks like it is in very good non-restored condition, although one of the knobs is missing. Jan got an extra dividend in the Cocktail Shaker and four Decanters. [I have seen the Cocktail Shakers alone sell on-line for $250!]
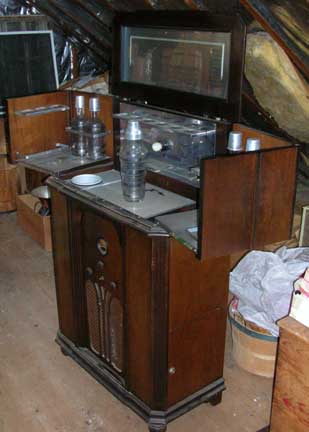
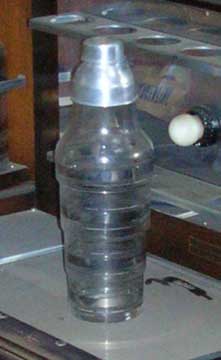

Radio Bar Photo sent in by Jan
The Same Model as Ours! Closeup of the Cocktail Shaker and Decanters
Click to Enlarge
Here are some great pictures sent to us by Jerry in Belmont, California. This bar has a great history -- his wife's aunt won it as a door prize at a movie theater during the 1930s. Jerry says that it is largely in original condition, although the grill cloth has been replaced.
Radio Bar Photos sent in by Jerry
Click to Enlarge
We receieved this from our reader Armand who now lives in Spain:.
"... I was interested to come across your feature on the American Radiobar of the 1930s. I have one of these, in fact mine exactly matches the illustration of Pat. D100-952, as invented by Ernest J Krause in 1935. I must admit, I'm surprised it's that old, until I came across your site I assumed it dated from the 50s. Also to read that only 10,000 were made, so I guess it's pretty rare.
It is made of cream-coloured wood with gold trim, rounded corners, has the liquor locker and its original speaker cloth. Although all the metal shelves and holders were in place (including two ice buckets and jiggers), sadly, the original shakers and glasses were missing. I paid $90 for it at a garage sale in San Francisco about ten years ago, and gently restored it (really just by removing the dead insects, washing and cleaning. It came up many shades lighter!). Now I see the photos though, it could do with a bit more work.
The radio and speaker were in perfect working order and sounded excellent, although it had an eerie predilection for only picking up old-time dance, jazz and gospel AM stations (great for retro prohibition-style parties!). I removed the electronics when I had it shipped to Europe where I now live. I was pretty sure the radio tuner wouldn't work properly here, and I probably couldn't get spares, so I rewired it and now it is in daily use as a cocktail cabinet housing an mp3 player with built-in Bose stereo speakers and a bass unit. So sue me, purists! ..."
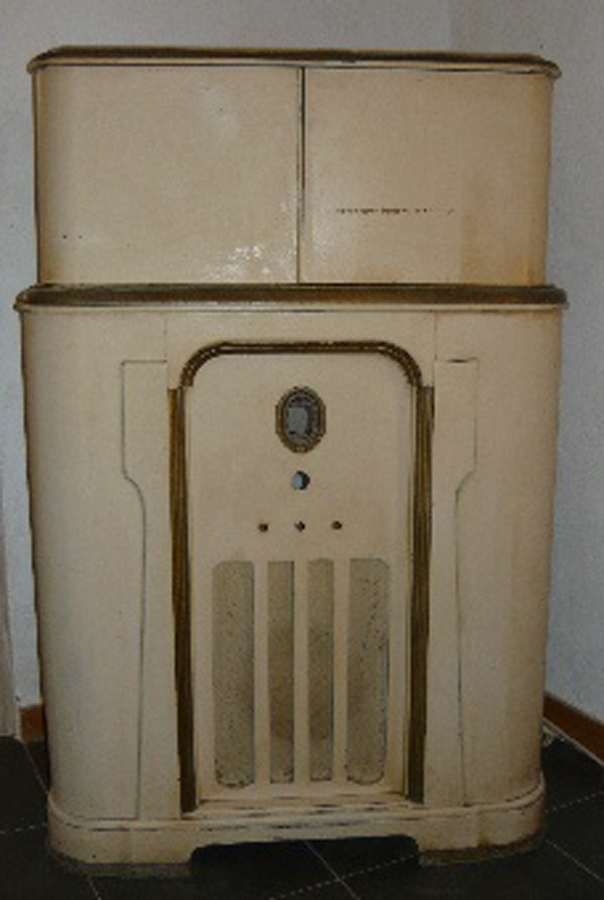
Radio Bar Photos sent in by Armand
Click to Enlarge
Please Send US your Radiobar pictures!
We were fortunate to find all of the glassware with the object. From what we can determine, the Radiobar is complete. Alas, there is a considerable amount of carpentry, electronics and refinishing work between the state shown above and the final restored glory. We invite you to join us in this project. We'll show most of the steps involved in bringing this beauty back to life.
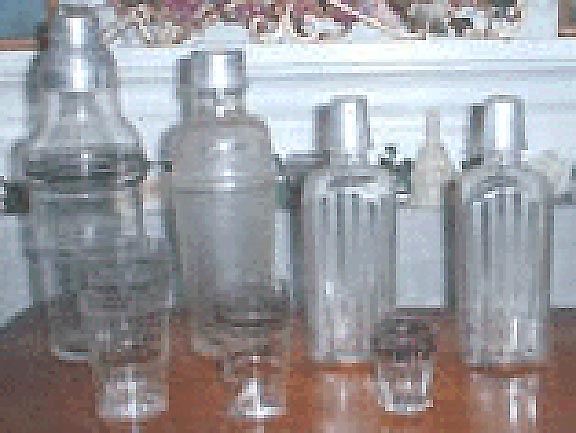
Radio Bar Glassware
Back: (l. to r.)Large Cocktail Shaker, Small Cocktail Shaker, Liquor Decanters
Front (L. to r.) 5 inch Tumbler, 3 inch Tumbler, Shot Glass
Click to Enlarge
There are (of all things...) other articles about restoring a Radiobar on the internet.
- Click here to view Bill Harris' restoration of the cabinet and chassis of a 1935 Radiobar
- Click Here to view another fantastic restoration of a very late, top of the line Radiobar
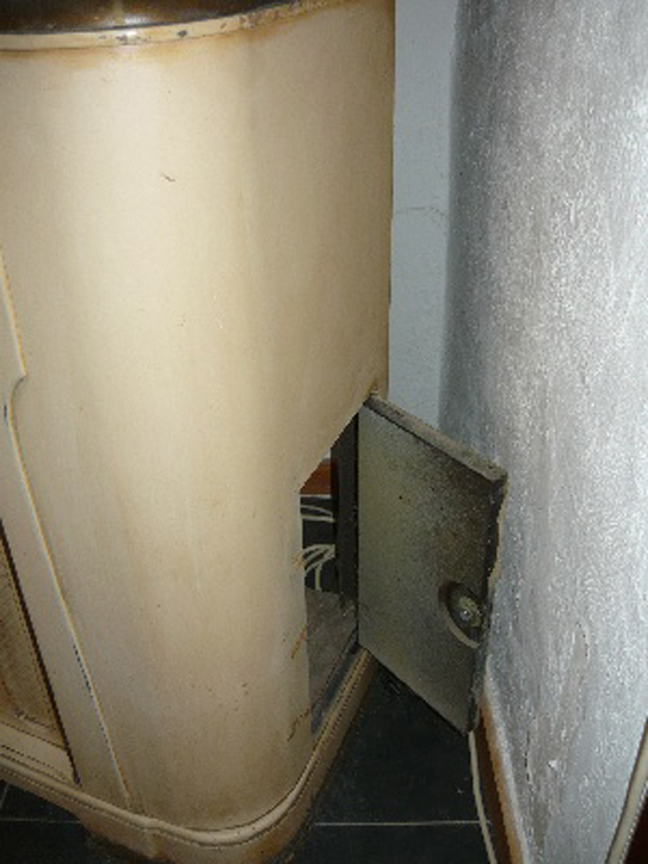
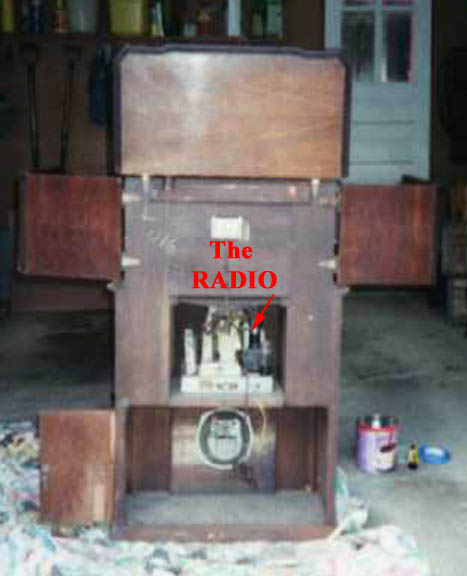
One of the interesting features of the Radiobar is the "Liquor Locker" --- most of the bottom space is empty and could serve as storage for various bottles. Access to this space is obtained through a locked door. Here is the back view --- we have removed a paperboard backing. The so called "Liquor Locker" was not all that secure. Note also how small the radio is relative to the whole.
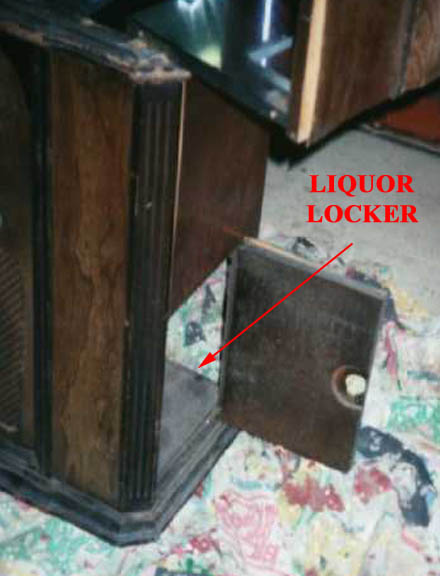
The Radiobar Liquor Locker
Keep the domestic staff honest...
Radiobar Back Showing the Actual Radio...A lot more "bar" than "radio"...<
Click to Enlarge
This is a very nice example of radio cabinetry. The basic components are made of birch plywood covered by mahogany veneer. The joinery is first class. The finish is shellac, most likely applied by spraying. The bar is finished in two tones, red mahogany masses with dark brown trim. The metal parts of the bar are made of stainless steel.
The first step in restoration is to totally dis-assemble the radiobar and to carefully assess the extent of damage. The bar had been exposed to water. The presence of spider egg cases and mildew suggests that the object had spent a considerable amount of time in a damp basement or a garage. The major problem is that water and humidity cause the shellac finish to deteriorate. In addtion, the mahogany veneer had begun to detach from the plywood "carcass". The extent of veneer problems ranged from simple detachment to severe warping and disfiguration. In some places, noticeably the lyre-shaped speaker grille, the plywood itself had begun to delaminate. Finally, the radio itself is a disaster area. The paper cone of the speaker is entirely missing, the filter capacitors show corrosion, and a tube is missing.
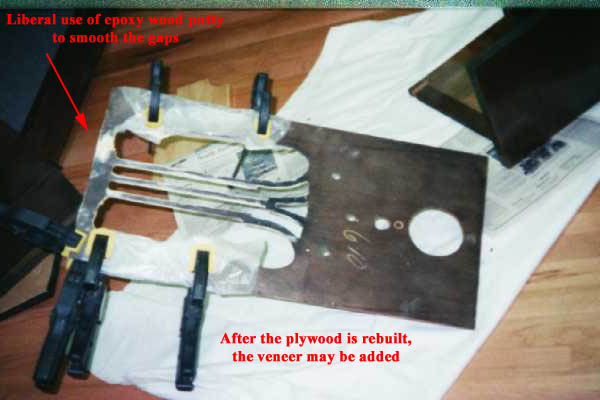
Carpentry Repairs
The top bar doors, left and right had unsalvageable veneer. The thin material had become detached and then warped. It was necessary to remove the existing veneer and replace it. Smoot Lumber in Alexandria sells a variety of veneers; we were fortunate that management let us go through their stock to find compatible material. Veneer is VERY thin wood --- it feels like manilla paper. Veneer is attached to the plywood substrate using contact cement as shown below. The adhesive (in the can) is brushed onto both the veneer and the substrate. It is allowed to dry. When the two surfaces are put in contact, the glue holds immediately and the pices cannot be separated (hence the name "contact cement") This treatment was required for the top doors, the the "Liquor Locker" door and several areas on the main case.
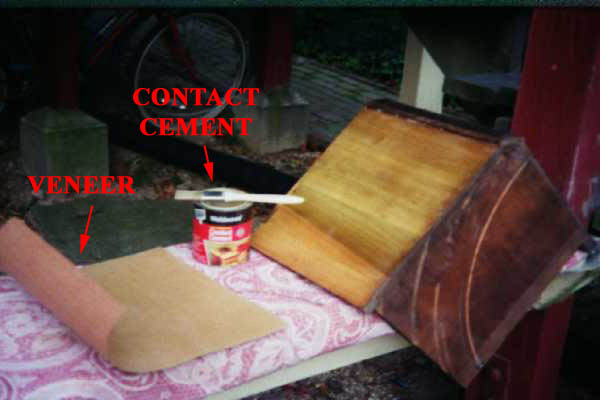
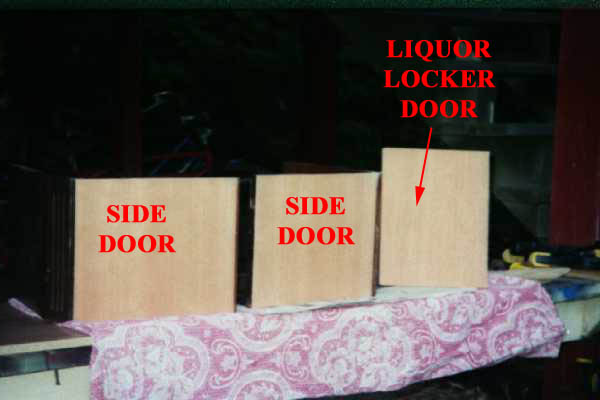
BR> Veneer Replacement
(LEFT)Let the Contact cement DRY on both parts...
(RIGHT) Doors With New veneer Click to Enlarge
Several types of carpentry repairs were necessary. Measurements indicated that the cabinet had become "racked", or out of square. The cabinet was brought into square with clamps and secured with glue and screws. In addition, several places were found in which the small areas of veneer had come loose. These could be repaired by injecting glue beneath the surface with a hypodermic needle and applying clamps. These techniques are shown in the picture below
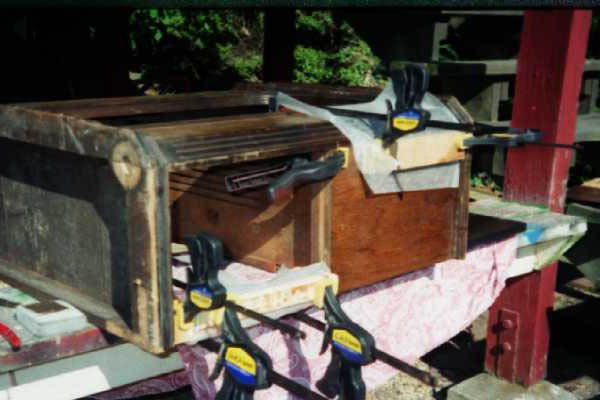
Getting the Cabinet Square and Securing Veneer
It helps to have LOTS of clamps...
Click to Enlarge
In the speaker grille, the plywood itself had begun to de-laminate. This is unfortunately in one of the most visible areas of the bar, so extreme measures were required. We patiently rebuilt the various layers of plywood, one at a time. (This procedure took a lot of time.) The following sequence shows some of these steps
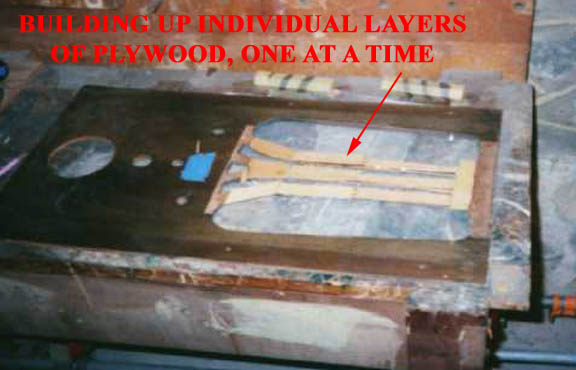
Fundamental Carpentry
(LEFT) Rebuilding the plywood substrate
(RIGHT) Completing the rebuilding of the plywood substrate
Click to Enlarge
After the substrate was restored, new veneer was applied to the speaker grille, making it completely whole.
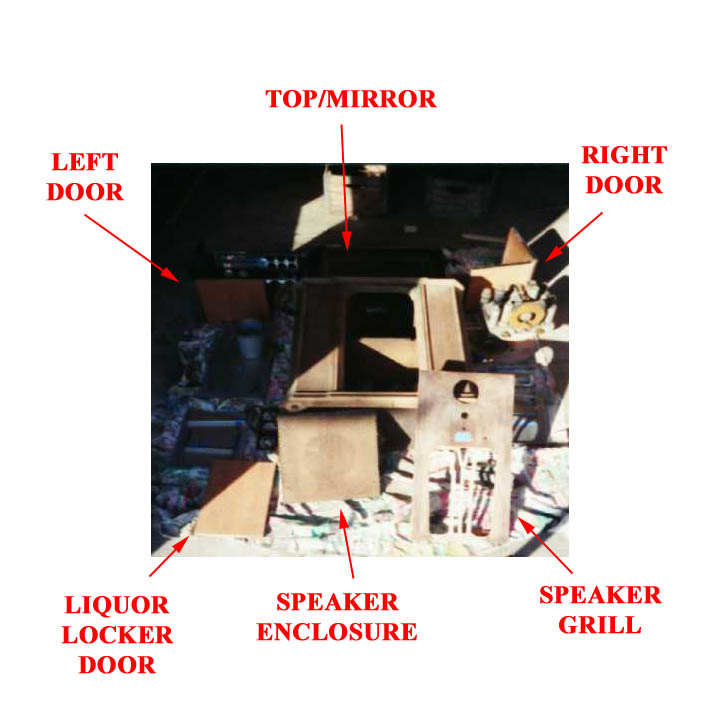
The Components of the Radiobar
...just waiting for the Finishing Process
Click to Enlarge
The photo above shows an "exploded" view of the entire Radiobar prior to applying new finishes
Refinishing the Radiobar
The exposure to humidity had caused considerable damage to the shellac finish. At this point it is worth noting that shellac is a natural product --- it is made from the secretions of an Asian beetle. Shellac is soluble in alcohol; basically the alcohol/shellac mixture is applied to the wood, the alcohol evaporates and a thin, hard protective layer remains. The finish is durable and takes a wonderful shine. It responds well to stain and lends itself to all kinds of artistic expression. Unfortunately, shellac scratches easily and has very poor response to water.
Small flaws in a shellac finish can be easily fixed by washing with alcohol --- essentially, the alcohol "re-amalgamates" the finish the shellac is dissolved and redeposited in a uniform layer. Alas, for our Radiobar, the finish had deteriorated to the point that amalgamation was not viable. Basically, refinishing consists of four phases:
- Sanding: the entire piece had to be sanded to remove flakes.
- Cleaning: dirt was removed by washing with Naphtha
- Re-Amalgamation: shellac left on the piece was smoothed with an alcohol wash
- Shellac: new shellac was applied, taking into account the new and old veneers
- Stain: various stain mixtures were applied to duplicate the original color.
- Tone: various pigmented coats are added to build a smooth lustrous surface that has color highlights just like "real" wood
Follow along with us in this unusual process
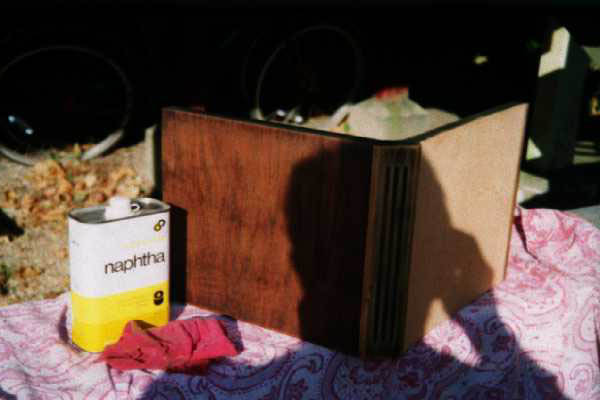
The Naphtha Wash
...removes dirt but won't raise the grain
Click to Enlarge
After the carpentry and sanding, there is a considerable amount of dirt on the piece. We want to get rid of the dirt before refinishing can begin. Raw wood should be cleaned with a product that will neither raise the grain nor dissolve the glue that holds the veneer. (this rules out water...) The very best wood cleaning product is Naphtha, a petroleum distillate. (Lighter fluid is mostly Naphtha) This washing process is done OUTSIDE in a well-ventilated area with ASOLUTELY NO SMOKING ALLOWED. Naphtha is EXTREMELY FLAMMABLE. It also does a fantastic job of removing all kinds of dirt and grit from down deep in the pores of the wood --- and it dissolves any grease or tar which may have gotten onto the piece. Best of all, it also gets silicone residue. This is important because NOTHING WILL STICK TO SILICONE. If there is even the slightest trace of silicone (say from furniture polish), paint, shellac, lacquer or urethane will "pucker up". Believe me, it pays to wash with Naphtha. Use rubber gloves when you do this or it will take all the oil out of your skin. The wash dries almost instantly, so you don't have to wait a long time to see results. Naphtha is fairly cheap --- about $5 worth served us very well.
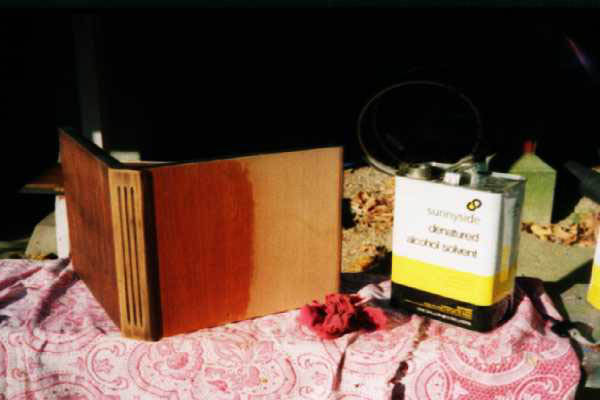
Amalgamating the Finish
...Alcohol is the solvent for shellac
Click to Enlarge
No matter how much you sand, there will always be a small residue of shellac on the piece. The best thing to do is to sand just enough to even things out -- remove the loose material and rough up the rest just a little. When the piece is cleaned with naphtha, you are ready to wash with Denatured Alcohol. (This stuff is also EXTREMELY FLAMMABLE). Take a 100% cotton rag (a piece of an old tee shirt is fine) and soak it in alcohol. Work in a small area (about four inches square.) Dribble a small amount of alcohol onto the wood and let it sit for about 20 seconds. Then begin to rub lightly with a "Figure 8" motion. Repeat until the shellac is smooth and distributed evenly.
This process pays a second dividend --- when the shellac is wet on raw wood (like the new veneer), it gives you a good idea about what the final finish would looklike, absent any stain. (this is shownin the picture). When the alcohol is on the previously finished parts, you can get an idea of what kind of stain was used. For the Radiobar, this analysis indicated that the stain had tones of red and yellow in it.
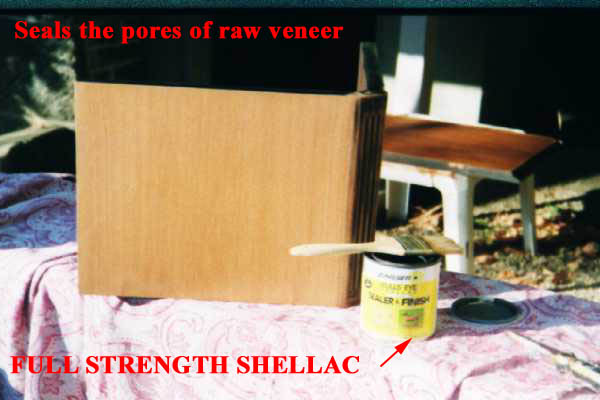
The Base for Staining
(LEFT) Full Strength Shellac on New Veneer
(RIGHT) Spit Coat on Old Veneer
Click to Enlarge
Wood varies considerably even within the same tree. In order to create a uniform color, pigments called "stains" are used. It is actually quite difficult to get a stain to penetrate evenly into raw wood. Shellac, on the other hand absorbs stain very evenly. Thus, shellac-filled pores in the wood are the base for stain.
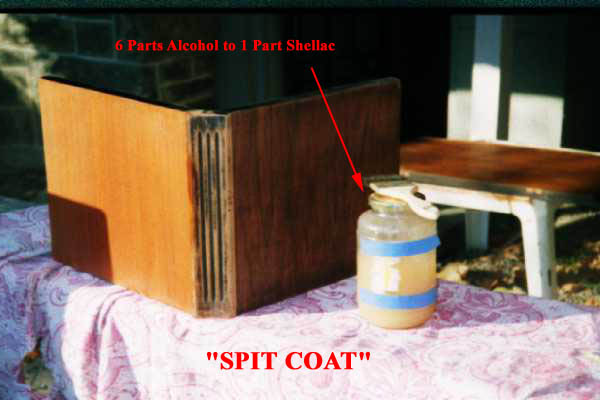
In our case, some of the wood is raw (new veneer) and some is fairly well saturated. The method for equalizing the base is to use full strength shellac on the new veneer while using a dilute mixture onthe old veneer. "Full Strength" is known in the trade as a "Three Pound Cut" --- dating back to the time when cabinetmakers mixed their own materials. One gallon of alcohol will exactly dissolve three pounds of shellac flakes making the thickest possible liquid. The photo shows the "3# Cut" ready to be applied. Always brush with the grain!
The old veneer gets a more dilute coat, known in the trade as a "Spit Coat". The exact proportions are 6 parts alcohol to one part "3# Cut" Shellac. I use an old applesauce jar with the proportions of each ingredient shown by blue lines. This dries almost as you apply it! Always brush with the grain!
Stain refers of various colored pigments (burnt umber, ochre, etc, etc) suspended in a solvent (e.g. alcohol, oil, water, etc.) whose purpose is to alter the color of wood while retaining other essential wood-like characteristics such as grain
- "Penetrating Stains" behave like dyes --- they enter the wood/shellac and have no surface presence.
- "Tone Stains" remain on the surface and have more opacity

Tone Staining
(LEFT) Mixing the Tone Stain
(RIGHT) Tools of the Trade
Click to Enlarge
In general, a tone stain is the best way to get a uniform color between the old and new veneers. The Tone Stain was prepared by starting with a commercial penetrating stain and then adding spar varnish. The varnish fills the pores and keeps the pigment on the surface. For the two colors in the Radiobar, I started with Minwax "Red Mahogany" and "Jacobean." Several test patches indicated that the mahogany stain needed some yellow pigment; the Jacobean stain was too light and was darkened with black
The Radiobar is a bit difficult because the colorscheme calls for red mahogany on the flat parts and a very dark color on the trim. It is almost impossible to mask the surface off because stain inevitably finds its way under the tape. Thus, the two-tone job required a very steady hand and a whole lot of patience. Small mistakes can be corrected using a q-tip soaked in paint thinner, but it is best to set aside a large portion of undisturbed time and do your job with very deliberate speed.

Completed Two Tone Stain
...You need a Big, Well-Ventilated Space
Click to Enlarge
Candidly, Shellac --- especially spray shellac --- was a LOUSY choice for a bar on the part of the Radiobar corporation. Why? Alcohol is the solvent for shellac... and (Duh!) guess what gets used around a bar...
This is a case where I felt that it was necessary to improve on the work of the Radiobar Cormpany. I would like to have refinished the case with toned spar varnish, but it take four days of drying between coats in the winter. I have to do refinishing work in the garage, so because of the temperature, I had to settle for a multi-layer urethane finish. It's hard to tell the difference between modern urethane and varnish, and the short drying time coupled with water-based cleanup carried the day.
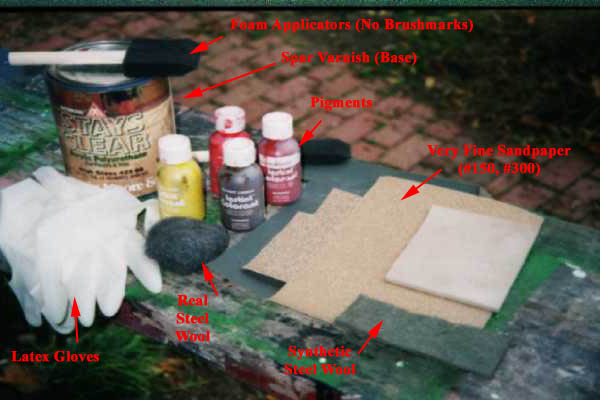
I relly don't know what to show about the final finishing process --- the color in internet-based photos isn't sensitive enough to show the progression. Thus, the photo shows the basic ingredients. You need PLENTY of disposable rubber gloves! I like to apply urethane (or varnish) with foam brushes because it prevents bubbles. I really like synthetic steel wool because you can wash it out. On the other hand, the synthetics still can't substitute for very fine (#0000) steel wool. The reason that you put on --- and take off -- all these coats of finish is that you are "cutting off mountains and filling in valleys." The various coats of varnish or urethane fill in the valleys. The sanding cuts off the mountains. Between coats, you sand with materials that have finer and finer grit --- so that you don't don't make any valleys that are ddeper than the ones you filled in...
In total, there were 15 coats of Urethane. The first 10 were color-toning (tinted) coats; Crimson, Red Oxide, Yellow, and Van Dyke Brown pigments were added, a few drops of pigment to an ounce of urethane. It helps to save plastic yogurt cups (and the lids) for this... The first five coats were wet-sanded with 400 grit emery paper; the next five were wet sanded with synthetic steel wool (#0). This builds up a lot of depth of color.
Five clear coats were then applied. The first two were dry rubbed with synthetic steel wool (#00 and #000); the third was dry-rubbed with #0000 steel wool. The fourth coat was rubbed with pumice, and the fifth (and last) was treated with auto rubbing compound. Carnuba wax completes the finish.
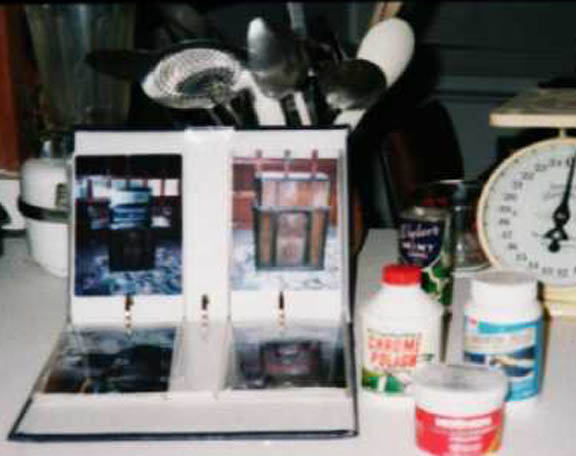
Putting the Chrome parts back On
(LEFT) Polishng the Chrome
(RIGHT) Assembling the Doors
Click to Enlarge
The radiobar Company advertised that it used "only the highest quality heavy chrome plated steel" for the bar surfaces. This was true --- there was virtually no damage to the chrome parts. In this picture, I show some of the things that helped out in this phase. First and foremost, there is the notebook of pictures that carefully document the location of each of the parts --- after all the time spent in carpentry and refinishing, it is easy to forget what goes where. There are three metal polishing products: TurtleWax Chrome Polish, Aluminum Jelly and (best of all...) Mother's Aluminum Polish. The last one is just fantastic --- I use it on all my aluminum appliances. With our trusty "Before" photos, it was possible to put each of the doors of the bar back together. The benefits of polishing and refinishing finally begin to show up!
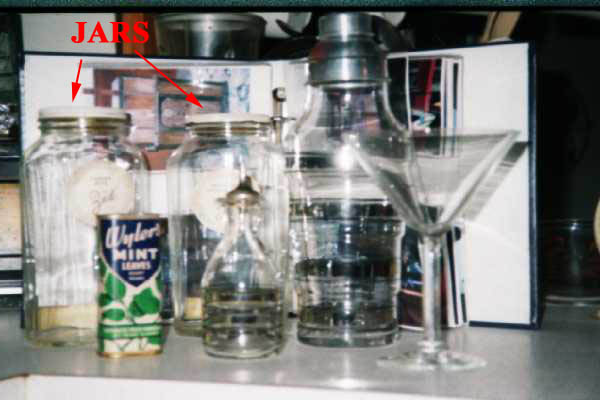
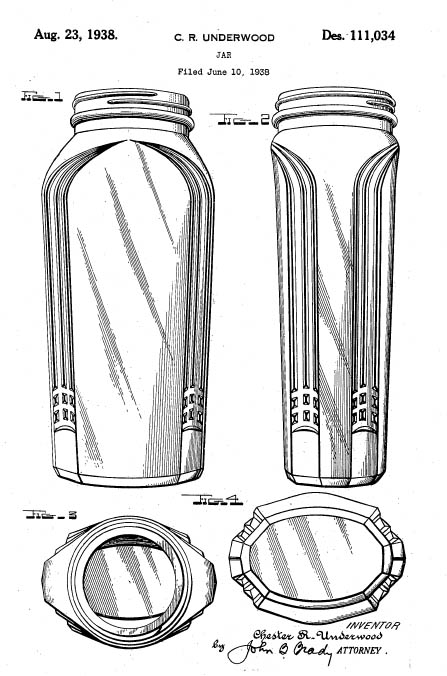
The Glassware
(LEFT) More Glassware, including Jars of Bar Snacks
(RIGHT)Design Patent D-111,034 for the jars
Click to Enlarge
Here is some of the glassware that came with the bar. Of note are the bottles (maked "Zed") that originally held bar snacks. They held a pound of cheese bits; the price (marked in crayon on the top) was 37 cents. My inflation indices put these back to the 1940s. You can also see the cocktail shaker and the little hypodermic-like vermouth dispenser. I was very surprised to find the design patent for these snack jars during my research on another topic. It just shows that you can patent almost anything.
Dealing with the Radio
The exposure to humidity had caused considerable damage to the radio. I examined the set closely and determined that the filter capacitors were totally shot and would have to be completely re-built, a time consuming process. Two of the tubes were broken, meaning a number of trips to flea markets. The chassis was rusted, meaning that most of the solder connections would have to be gone over. Uh Huh... 6 months work and I would have --- Ta Da! --- a nonselective AM radio...
This is a five tube radio. I could not find a Philco model number, although the chassis bears the number 122842. The Tube lineup is:
- GA8G
- 6Q7
- 6Q7G
- 6K7G
- 6K7G
With all due deference to the purists in the Radio Community, I decided against restoring the radio... for now. I carefully wrapped everything up and stored it. Now, you should know that there are people who would actually take each capacitor apart, melt down the tarry phenol that separates the plates and carefully rebuild the thing. They would remove the components, clean up the chassis and repaint it in original factory paint. They would patiently seek out new tubes. Well, maybe I'll do that when the winter sets in... I'll be sure to keep you informed. BUT for the time being, I am going to replace the radio.

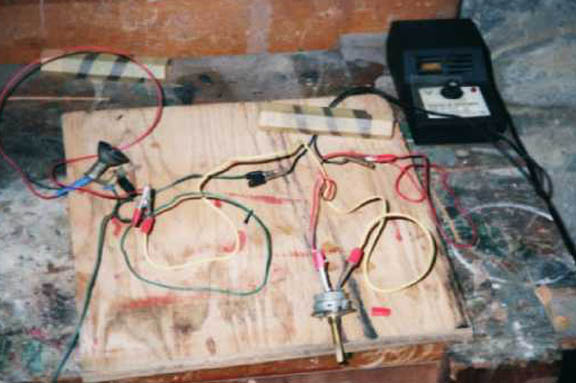
The Dial
(LEFT) Rube Goldberg Device to Save the Dial
(RIGHT)Testing the Dial Mechanism
Click to Enlarge
The dial of the radio had a very clever feature --- the orange celluloid dial was set in a framework that holds a small prism. A high intensity light focuses on the prism and generates a thin beam of light which is then rear-projected onto the dial through a very thin aperture. The result is that there appears to be a bright white line on the dial corresponding to the frequency that is being tuned. (There is no "needle")
I thought that this was so incredibly cool that I decided to save the "virtual dial". This photo shows the Rube Goldberg device that I built to hold the mechanism in the correct place. By the way, none of the parts on the radio was damaged in making this gadget, so I can always go back to the original radio.
The key to making the "virtual dial" work was the high intensity light. I removed the on/off switch from the radio (it can be put back, purists...) and rigged up this little test block. I was able to use a 3.5 volt power supply from a long-lost calculator or phone or game or something to run the light. (Save those DC power supply gadgets!!!) The alligator clips were used to find the correct lead on the switch.
The Finished Product
Thanks to the notebook full of photos and sketches, re-assembly of the Radiobar was a fairly straightforward process. A helpful tip is: if you want the "end phase" to go smoothly, then label and tag all the parts very carefully! Patience is also a virtue --- in disassembling the Liquor Locker, I broke the casing for the lock; I am indebted to the folks at Strosnider Hardware in Bethesda because the staff in this age-old hardware store were actually able to find me a replacement casing!!! That is nothing short of amazing.
The Liquor Locker Gets a New Use
...Yes, it has a remote...
Click to Enlarge
I was fortunate to find a little AIWA shelf stereo set that has an AM-FM Tuner, Cassette Deck, and 3-disc CD changer. The set cost less than $60 (on deep sale at Circuit City...). I was able to hide the entire system inside the liquor locker. The thing even has a remote.
Right now, the purists are probably tearing their hair out... A remote???
Well, that is not at all far fetched! In 1938, Philco actually introduced --- of all things -- a real live wireless remote that was known as the Philco Mystery Control. Click here to find out more about History's First Remote.
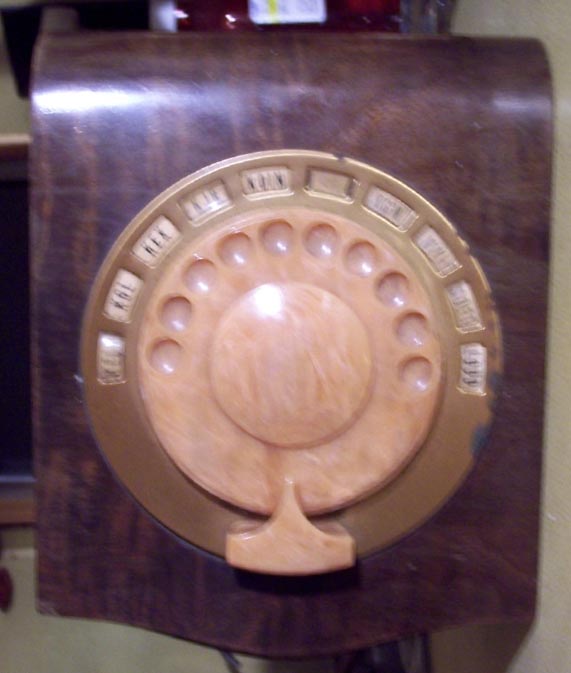
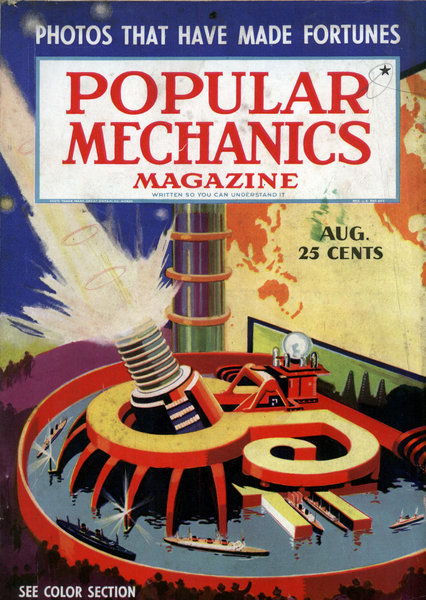
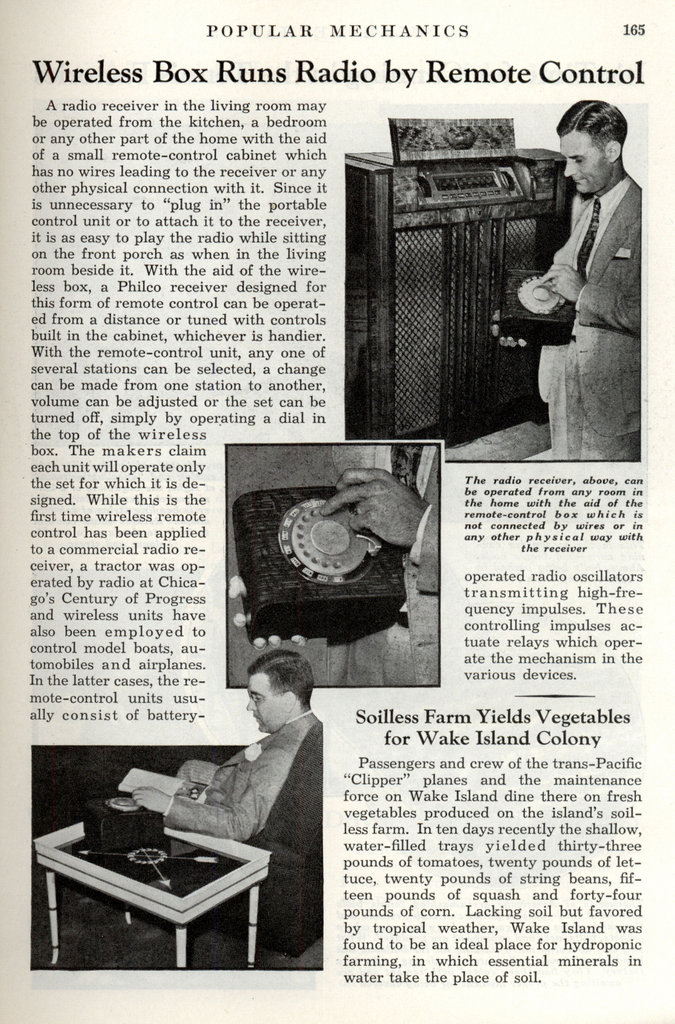
History's First Wireless Remote
The Philco Mystery Control --it worked just like a telephone dial
You could activate station presets, change the volume,and turn the set on and off
Read about it in the August 1938 issue of Popular Mechanics
Click to Enlarge
The set works very nicely inside its Liquor Locker!
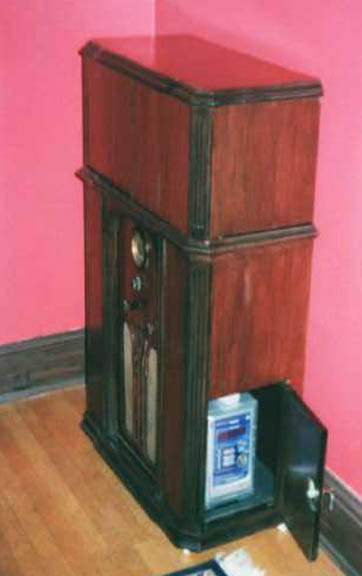
This is what the bar looks like when it is closed.

The Finished Product (1)
(LEFT) Final Appearance, Front Closed
(RIGHT)Appearance, Back
Click to Enlarge
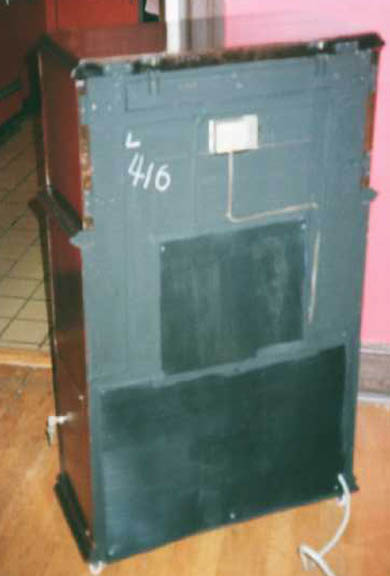
I made a new dust cover for the radio and a back for the liquor locker. The only departure from the original appearance is a FM antenna which is hidden under black tape. I even duplicated the chalk marks on the cabinet made at the factory (They identify the cabinet as Model 416 --- the same number is stamped into all of the wooden parts)
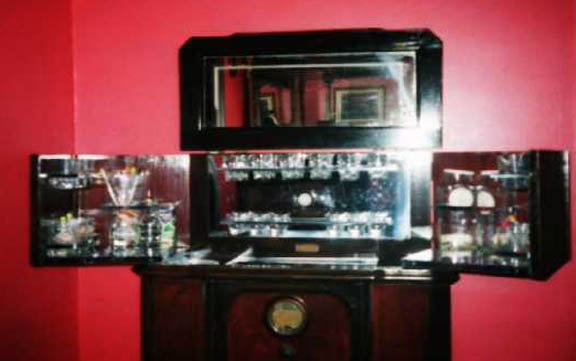
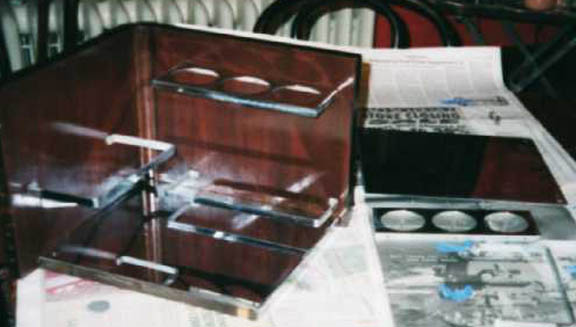
The Finished Product (2)
(LEFT) Final Detail of the bar
(RIGHT)Complete Radiobar, open
Click to Enlarge
I took one of the original glasses down to the City Market (near Gallaudet College). I found a very nice fellow who owns a used restaurant fixtures store who let me sort through several boxes of old glasses. Of all things (this was really a long shot), I actually found enough matching glasses to complete the bar. At the right is the final picture of our RadioBar. It was a thoroughly enjoyable two months of work. We will treasure our Radiobar into the future!
Stay tuned for more restoration projects!
Counter for the Entire Site (not just this page..)
Home | About Lindy | 1940s Collectibles | Upcoming Events | Vintage Clothing
The Guide - Establishments - Travel - Accessories
Music | Links | Photo Gallery | Extras | Contact